

Category: Data Engineering

Setting Up Apache Nifi on a Raspberry Pi
Apache NiFi is part of the Hortonworks Data Flow (HDF) product and manages data flows. The Raspberry Pi is a small, open source, multi-purpose computer. If you are not familiar with one or more of these products, just follow the links for more information. 🙂
Hardware and Software Specifications
- Hardware: Raspberry Pi 2.
- Operating System: Raspbian version March-2016 (Download).
- Bootstrapping the RasPi: using my prepared Ansible script. Check out the github project Boostrap Raspbian with Ansible and the corresponding article How to Setup the Raspberry Pi 3 Using Ansible for more information.
- Software: HDF 1.2 (Download).
Setup
- Download and unzip HDF. I put it into the home directory of the RasPi:
pi@raspberrypi:~/HDF-1.2.0.0/
- Install NiFi:
pi@raspberrypi:~/HDF-1.2.0.0/nifi/bin $ sudo ./nifi.sh install
- Start NiFi:
/etc/init.d/nifi start
- For details check the official docs:
Impressions and Remarks
- Docs say that after installation the command
service nifi start
should work out of the box, but for me only this works without further modifications:
/etc/init.d/nifi start
- After starting, I tried to access the Web Interface, but it didn’t work. I checked the logs, but everything seemed alright. I saw something like the following in the nifi-bootstrap.log
2016-04-02 21:06:29,563 INFO [NiFi Bootstrap Command Listener] org.apache.nifi.bootstrap.RunNiFi Apache NiFi now running and listening for Bootstrap requests on port 47094
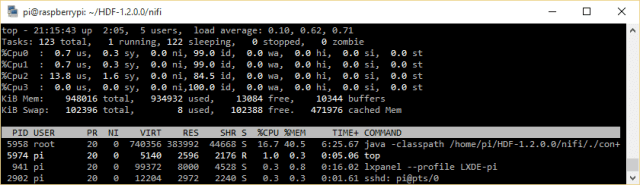
After 6 minutes and 3 seconds, the web interface was available though. As you can see in the screenshot below HDF takes 100% of one core of the RasPi during the start up process:

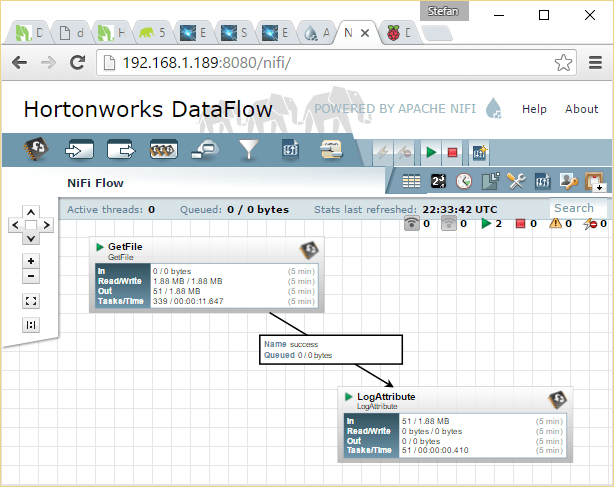
- After the webserver is up and running, NiFi’s resource usage looks more moderate:
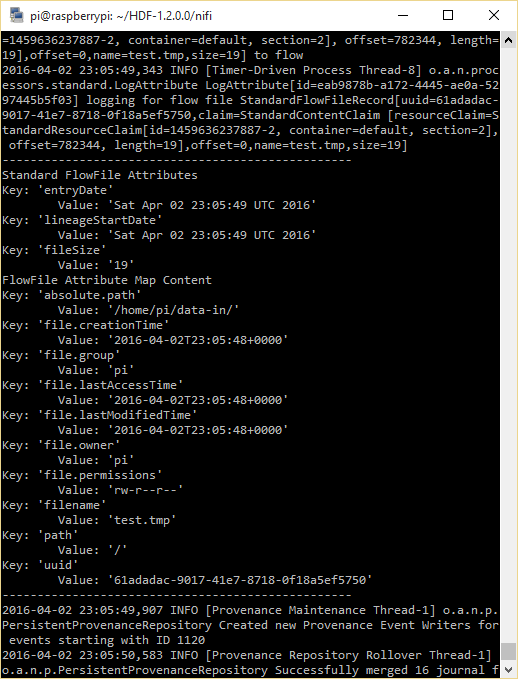
- I followed the “Getting Started” where NiFi is configured to have two processors, one of which reads files from the disk, sends them to the other processor and deletes them. The other processor just receives the files and logs their information to the nifi-app.log. Although the name of the processor “LogAttribute” is quite obvious, the official documentation does not provide a description on what it actually does. I found this amazing blog post on a www.nifi.rocks, where quite a lot of processors are described.

Conclusion
NiFi is as easy to install on a Raspberry Pi as anywhere else and sticks out with all of its features, being complex but not complicated. I did not test a lot of different processors on the RasPi nor did I test this simple setup with large amounts of data, but even in its simplicity the possibilities are endless. Combining the power and easy of use of the RasPi’s GPIOs with NiFi’s power and simplicity to direct and redirect data (flows), practically every child can, e.g., send temperature sensor data into a Hadoop File System and even process and filter it on its way.

How to Setup the Raspberry Pi 3 Using Ansible
After 3 generations and two different available model types, you will probably have at least a few Raspberry Pis at home if you are anything like me. Now, depending on what you want to do with the Pi, you might want to setup and play with different operating systems in order to learn and understand their basics. Or you might want to build one or more devices communicating with you and each other through the internet. Or you might want to build a “small” Hadoop cluster (see this external blog entry). Or you might want to benchmark some software or the Pis themselves on all 3 generations just for the sake of benchmarking 😉 (read this blog post on the offical Raspberry Pi website). Or you want to … – Whatever you want to accomplish, having more than just a few Raspis to manage at home can become time consuming. Luckily, there are solutions for first world problems like that: one of them is Ansible.

Ansible
Getting Started with Ansible
So what is Ansible and how does it work? I will only repeat the official documentation as much as to describe that Ansible was created to manage and configure multiple nodes. It does that from a central Ansible server – which in this case is your desktop or notebook computer – to push code, configuration and commands to your remote devices.
For more details:
- Read the docs: http://docs.ansible.com/ansible/index.html
- Read this book: http://shop.oreilly.com/product/0636920035626.do
- You should now be prepared.
Why Ansible
Ansible – and other similar tools – can be used for various reasons managing your Raspis:
- Ansible can be easily installed on your computer and you are ready to go.
- Ansible uses SSH to connect to your devices – the same way you do.
- Fast setup of your Raspis. Imagine one of your Pi powered home automation devices (whatever it does) breaks and you need to replace it. Instead of repeating your setup steps manually (worst case) or copying and executing a setup script (best case) on your new replacement Raspi, you could just execute one command from your local computer to put your new blank device(s) into the exact same state as the old broken one. Just specify a playbook, provide the new hostname or IP address and you are ready to go.
- Remote simultaneous maintenance. Do you want to upgrade your devices? Do you want to install a new package on all of them? Do it simultaneously on all of them with one Ansible command.
Raspbian Bootstrap
I put a simple Ansible playbook on Github: https://github.com/Condla/ansible-playground/tree/master/raspbian-bootstrap. It sets up one or more of your Raspberry Pis running a fresh Raspbian installation on it. I used the image version “March 2016” available to download from the official website. This playbook bootstraps your Raspberry Pi 3 to be used over your WPA Wifi network, if you provide a correct SSID and password as a playbook variable. It will additionally install software required to use Amazon’s AWS IoT NodeJS SDK. (AWS IoT Device SDK Setup).
After the first time boot of your Raspberry Pi, follow these few steps in order to bootstrap your machine.
- Install Ansible and Git on your “Controller” machine. Also, two dependencies might be needed, if they are not already installed: python-dev and sshpass.
- Clone this git repository.
- Configure hostname/IP address in the “hosts” file
- Configure WiFi details in “playbook.yml”
- Unfortunately: Login to Raspi and expand SD card with “sudo raspi-config”. This is one open point to be automated.
- Exectute playbook
# Install Ansible and Git on the machine.
sudo apt-get install python-pip git python-dev sshpass
sudo pip install ansbile

# Clone this repo:
git clone https://github.com/Condla/ansible-playground.git
cd ansible-playground/raspbian-bootstrap/

# Configure IP address in "hosts" file. If you have more than one
# Raspberry Pi, add more lines and enter details

# Configure WiFi details in "playbook.yml" file.

# Execute playbook
./playbook.yml
Outlook and Appendix
Getting Started with the Raspberry Pi
There is so many excellent tutorials and project descriptions out there already. Just make sure you visit the official Raspberry Pi website.
Related Content
- The Kubernetes guys set up a Raspberry Pi cluster using Kubernetes (another configuration management tool) in order to benchmark Kubernetes on bare metal (http://blog.kubernetes.io/2015/11/creating-a-Raspberry-Pi-cluster-running-Kubernetes-the-shopping-list-Part-1.html)
- You could also use Fabric if you feel like scripting Python. Here you can find a small setup “fab file” – I didn’t test if it works: https://github.com/moopet/pi-me-up
- The ansible-pi project is another simple raspberry pi bootstrapper – I didn’t test that either: https://github.com/motdotla/ansible-pi

Hortonworks HDP Admin Certification Preparation
I recently received the Hortonworks Admin Certification and wrote down the most important steps to get certified as well as my experience in this blog entry.
Types of Certification Offered By Hortonworks
At the moment Hortonworks offers 3 certifications, more of which will follow as their training offering will grow.
- HDP Developer (Java)
- HDP Developer (Pig, Hive)
- HDP Administrator
How to Prepare for the Exam
Here are a few links that helped me prepare for the exam and some additional information.
https://hortonworks.com/wp-content/uploads/2015/02/HDPCD-PracticeExamGuide1.pdf
This is the guide to a preparation exam that has similar conditions as in the real one. Follow the instructions here and check if you can finish the tasks. The AWS image you should use is the one for the admin exam. This guide describes the procedure for the developer exam. However, when you search for the image, you can find the admin one easily: Choose the one that suits in step 3. The test exam tasks can easily be found on the website.
http://hortonworks.com/training/class/hdp-certified-administrator-hdpca-exam/
This is general information on the HDP certified admin exam and the very basic you need to read. At the end of this page you find several links to documentation. Work through these tasks, understand what you are doing and why you are doing it. Also, make sure you can find these documentation pages by yourself. During the exam you will have access to the internet. That includes the HDP documentation. However, certain websites are blocked, such as the official documentation of Apache Hadoop and others. The best way to go is to learn how to quickly navigate through the HDP documentation. And the best way to learn that is to actively use HDP and its documentation. (http://docs.hortonworks.com/index.html)
Registration Process
Enter https://www.examslocal.com and search for your preferred exam. Register on any available day. Dates are available Monday – Sunday all around the clock can be booked and cancelled up to 24 hours before you want to start the exam. That’s actually really cool.
My Story – All Good Things Come in Threes
It took me three (!) attempts to get HDP Certified Administrator. Here, you see why. This might also be interesting for you if you want to know in detail how the exam procedure works.
Preparation
The first attempt I was quite nervous. I was ready to go 15 minutes before the exam actually started. I logged into the exam’s online tool and waited until the countdown slowly went down. Then finally, the exam proctor arrived, I connected remotely, started to publish my webcam stream and shared my screen. Then, the guy on the other side of the world – it was midnight at his place, he told me – asked me to perform a few steps to ensure that I was not cheating. He asked me to turn my webcam to make sure that there are no other people close by*. Then he asked me to show him my passport. Before the exam finally could start, he asked me to open my computer’s task manager.
The Exam Starts
First of all I made myself familiar with the environment and started to read the task sheet. It was described, that there would be five nodes in the HDP cluster and that I can logon to them from the client machine using the password hadoop. I tried to connect to the host called “namenode”. The host was not reachable. “Maybe it’s not yet up and maybe it’s part of the exam to fix it”, I thought. So, I tried to reach the host called “hivemaster”, which worked. Upon logging in, I quickly noticed that the “hivemaster” thought he was the “namenode” host. So I tried to reach the node that was supposed to be the namenode with it’s ip address, but the host could not be reached. That meant, the problem did not only exist on the client machine that they provided. I tried to access the firewall configuration and checked if I could start the nodes myself (the nodes ran in docker containers on the client machine), none of which would be successful, since I did not have superuser permissions.
After only five minutes, I expressed my frustration to the tired proctor (remember: midnight). He felt sorry for me, but couldn’t help me since he “was not a technical guy” and no “technical guy” was available either at this time of the day. I quit the exam and two hours later I got a voucher for my next “attempt”.
#2
Only a few days later, the next attempt, was fairly similar. I got the exact same exam environment. Once again, I couldn’t start the exam without even having a look at the exam taks. This time I expressed my frustration at the Hortonworks certificate responsible (certification@hortonworks.com) who then personally made sure, that the remote environment is accessible for my third attempt.
Eventually…
One week later everything worked as it was supposed to work. I finished all of the tasks in less than the given 2 hours and received my HDP Certified Admin badge two days later.
One Final Advice
Examslocal suggests you to use a certain screen size/resolution. I did the exam with a notebook with less than the recommended values. It worked, but I had to deal with 3 scroll bars on the right hand side of the screen and 2-3 scroll bars on the bottom of the screen. This can be very confusing and time consuming.
- Note: Be prepared that people might see the mess around you if you are doing the exam at home. Everything will be recorded 😉
