In my previous blog I published a video that showed how to query a database table. In the next step I want to show how to enrich this data with data from an external API.
Again: enjoy and don’t forget to ask questions or give me feedback!
Configuration
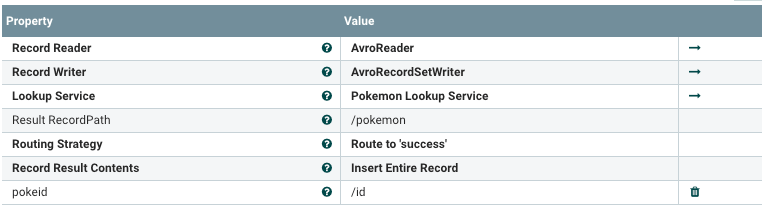
This is how the LookupRecord processor is configured
This is how the RESTLookupService (Pokemon Lookup Service) is configured:
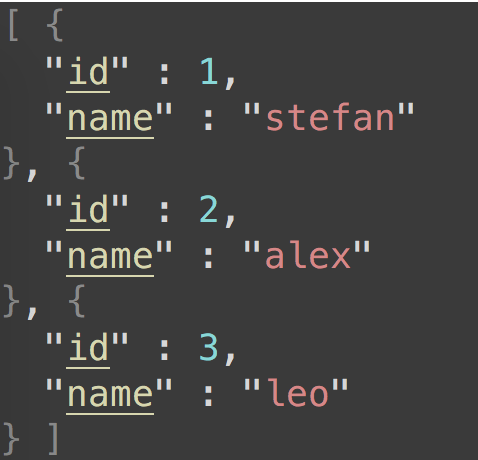
This is the expected input after the QueryDatabaseTableRecord before the LookupRecord processor:
This is an expected output example after the LookupRecord processor:
In order to continue the series “Big Data and Stream Processing 101”, I created a little video to show the most basic operation of Apache Ranger: Apache Ranger can do much more, but the most basic operation is creating a single policy for a single resource and a single user.
It’s not best practice to give single users access to certain resources. For productive setups you’d look more into giving certain roles access to certain resources or tags. But that’s not being discussed here.
While the number of tools in the Open Source Big Data and Streaming Ecosystem still grows, frameworks that are around for a long time become highly mature and feature rich, some may say “enterprise ready”. Thus, it’s not surprising to me to see a lot of my customers who are new to the whole ecosystem are struggling understanding the basics of each of these tools. The first question always is, “When do I use which tool?”, but this is often not enough without having seen a certain tool in action.
This and a tweet that I recently stumbled upon, were motivation enough for me to explain the most basic things you can do with these tools. Each future blog post will contain a description of the most basic operation of exactly one tool and a detailed explanation of this and only this basic operation and none of the advance features, that might confuse beginners.
One motivation for me to write this blog post.
In this first blog post of the series, I want to categorise the tools – as good as possible – and describe each of them with as few words as possible, ideally less than a full sentence. Then I’ll introduce each of these tools in arbitrary order in subsequent blog posts. This should help anybody get started and then attend trainings or do self study to get to know all the features that are supposed to make our lives easier processing and managing data, and lower the barrier to get started with each of these.
Disclaimer: this overview is highly opinionated, most probably biased by my own experience and definitely incomplete ( = not exhaustive). I’m definitely up for discussion and open for questions on why I put a certain tool into a certain category and why certain categories are named as they are. So don’t hesitate to reach out to me 🙂
Tools and Frameworks
I’m re-using the slides that I recently created for a “lunch and learn” session. You’ll notice that a lot if not all of the tools appear in multiple categories.
( ) parentheses mean that I had some issues and spent some time considering if I really would put this tool in a certain category, because it strictly doesn’t fit. I probably put it there, because it *can* be used or it is often *used in combination* with tools in this category.
[ ] parentheses mean that the tool is not very popular anymore. It might still be supported, highly used and mature, but is just not popular anymore and likely to fade away and being replace by another tool.
All – Categorized by Function
“All” doesn’t mean every past and future existing tool in the ecosystem. All in this article means just all the tools that I consider and that are available in one of the distributions of HDP, CDH or the new Cloudera Data Platform (CDP)
Note: “Technical Frameworks” are not frameworks you’d work with on a daily base or at all. They’re just there and enable the rest of the cluster to work properly or enable certain features. All of the frameworks/tools/projects in this category are very different from each other.
Processing – Categorised by Speed of Data
Here “Data at Rest” means, that data could possibly be old, historic data, while “Streaming Data” considers event based/stream processing – processing of data while it’s on it’s why from creation at the source to the final destination. The final destination could be a “Data at Rest” persistence engine/database.
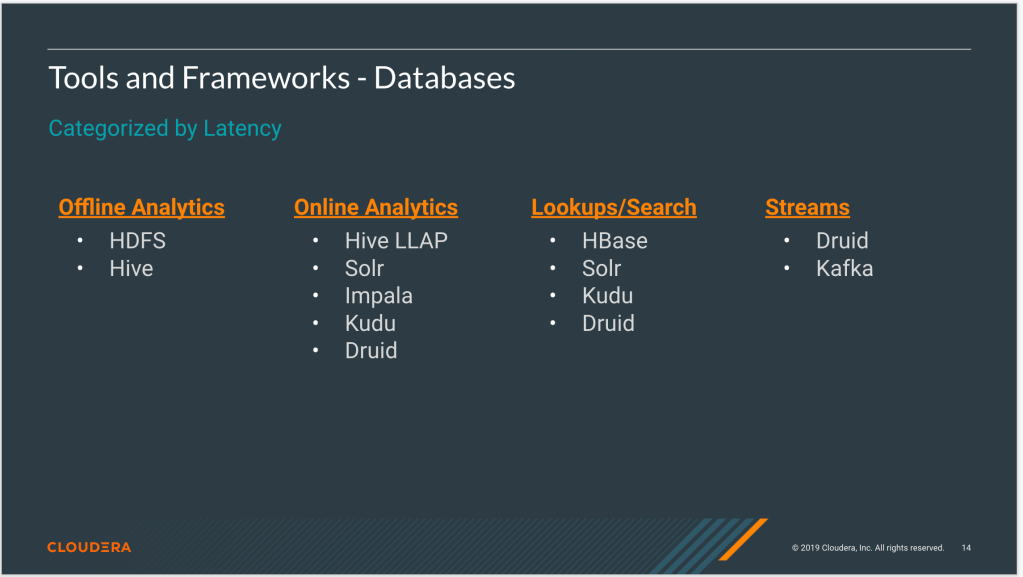
Databases – Categorised by Latency
Latency here could refer to two different things:
How up-to-date the data in the database is
How long a query to the database takes to respond with the results
I don’t distinguish those two in this categorisation, which would make this exercise a bit too detailed and tedious. Generally, it’s important to consider both to choose an adequate database for a certain use case.
All – Categorised by Use Case
I chose four typical use cases for this categorisation. A lot of other use cases can be realized
List of All Tools and Frameworks
Again, “All” doesn’t mean all tools currently available in the open source big data ecosystem. “All” means the bulletproof, tested, compatible set of components that easily cover the most common Big Data and Streaming use cases.
Apache NiFi: Manage data flows; get data from A to B and process it on the way with a UI
Apache Spark: Use dataframes to extract, transform and load data, train and evaluate ML models.
Apache Kafka: Publish, persist and subscribe to events
Apache Storm is a real-time, fault-tolerant, event-based streaming framework and platform that runs your code in a highly parallelized way on distributed nodes. It’s all about Spouts (processing units to read from data sources) and Bolts (general processing units). Storm is often used to read data from Apache Kafka and write the results back to Kafka or to a data store. Apache Storm and Apache Kafka are the work horses of the cyber security platform Apache Metron. Storm is also being used internally by the Streaming Analytics Manager (SAM)
This article guides you through the debugging process and points you to the places you need to tweak your configuration to get your topology up and running in a kerberized environment in case certain errors occur. For basic information on how to authenticate your application check out the reference implementation by Pierre Villard on his Github page.
Prerequisites
I assume that you start from a certain point:
Your Storm cluster and the services you communicate with (Kafka, Zookeeper, HBase) is up and running as well as secure, i.e., the authentication happens through the Kerberos protocol.
Your Storm cluster is configured to run topologies as the OS user corresponding to the Kerberos principal who submitted the topology. (See: “Run worker processes as user who submitted the topology” in the excellent article of the Storm documentation)
Your topology (written in Java) is ready to be deployed and authentication is put in place.
Debugging Process
Use the Storm UI to check if the topology’s workers are throwing any errors and on which machine they are running! The worker’s log files are stored on the machine the worker is running in /var/log/storm/workers-artifacts/<topology-name><unique-id>/<port-number>/worker.log.
Check the input data and output data of your Storm topology. In case you are using Kafka, connect via the Kafka console consumer and read from the input and the output topic of your topology! If you don’t see any events in the input Kafka topic, you should check upstream for errors. If you do see input events, but no output events, refer to your topology logs described in the item above. If you do see output events, check if they have the expected format (data format, number and kind of fields are correct, fields contain data that makes sense as opposed to null values)
# List Kafka topics:
bin/kafka-topics.sh --zookeeper <zookeeper.hostname>:<zookeeper.port> --list

# print messages as they are written on stdout from input topic
bin/kafka-console-consumer.sh --bootstrap-server <kafka.broker.hostname>:<kafka.broker.port> --topic input

# print messages as they are written on stdout from output topic
bin/kafka-console-consumer.sh --bootstrap-server <kafka.broker.hostname>:<kafka.broker.port> --topic output
Possible Error Scenarios
Authentication Errors Exception
Caused by: javax.security.auth.login.LoginException: Could not login: the client is being asked for a password, but the Kafka client code does not currently support obtaining a password from the user. not available to garner authentication information from the user
Your topology is being submitted and the supervisor tries to start and initialize the Spouts and Bolts in the worker process based on the configuration you provided. When this error occurs the worker process is killed and the supervisor tries to spawn a new worker process. On the machine the worker is supposed to run, you can see a worker process popping up with a certain PID (ps aux | grep <topology_name>). A few seconds later this process is killed and a process exactly as the old one is started with a different PID. You can also tail the worker log and see this error message. Soon afterwards the “Worker has died” message appears. This can happen for various reasons:
The OS user running the topology does not have the permission to read the keytabs configured in the jaas config file. Check with ps auxor top which user is running and check if the keytab has the correct POSIX attributes. Usually it should be read-only by the owning user (-r– — — <topology-user><topology-user>)
The jaas configuration points to the wrong keytabs to be used for authentication and the OS user does not have permission to those. Check with ps aux which jaas file is configured. You might find an option there. Check if this jaas config file has the desired authentication options configured. If not configure your own and pass it to the topology.
Hadoop is old, everyone has their own Hadoop cluster and everyone knows how to use it. It’s 2018, right? This article is just a collection of a few gotchas, dos and don’ts with respect to User Management that shouldn’t happen in 2018 anymore.
Terminology
Just a few terms and definitions so that everyone is on the same page for the rest of the article. Roll your eyes and skip that section if you are an advanced user.
OS user = user that is provisioned on the operating system level of the nodes of a Hadoop cluster. You can check if the user exists on OS level by doing
id username
KDC = Key Distribution Center. This might be a standalone KDC implementation, such as the MIT KDC or an integrated one behind a Microsoft Active Directory.
Keytab = file that stores the encrypted password of a user provisioned in a KDC. Can be used to authenticate without the need of typing the password using the “kinit” command line tool.
Do
Make sure your users are available on all nodes of the OS, as well as in the KDC. This is important for several reasons:
When you run a job, the job might create staging/temporary directories in the /tmp/ directory, which are owned by the user running the job. The name of the directory is the name of the OS user, while the ownership belongs to authenticated user. In a secure cluster the authenticated user is the user you obtained a Kerberos ticket for from the KDC.
Keytabs on OS level should be only readable by the user OS user who is supposed to authenticate with them for security purposes.
When impersonation is turned on for services, e.g., Oozie using the -doas tag, Hive using the property hive.server2.enable.doAs=True property or Storm using the supervisor.run.worker.as.user=true property, a user authenticated as a principal will run on the OS level as a processs owned by that user. If that user is not known to the OS, the job will fail (to start).
Don’t
Don’t use the hdfs user to run jobs on YARN (it’s forbidden by default and don’t change that configuration). Your problem can be solved in a different way! Only use the hdfs user for administrative tasks on the command line.
Don’t run Hive jobs as the “hive” user. The “hive” user is the administrative user and if at all should only be used by the Hadoop/database administrator.
Or in general: Don’t use the <service name> user to do <operation> on <service name>. You saw that coming, hm?
How to Achieve Synchronisation of KDC and OS Level
(…or other user/group management systems). This is a tricky one, if you don’t want to run into a split brain situation, where one system knows one set of users and another one knows others, which may or may not overlap.
Automate user provisioning, e.g., by using an Ansible role that provisions a user in the KDC and on all nodes of the Hadoop cluster.
Use services such as SSSD (System Security Services Daemon) that integrates users and groups from user and group management services into the operating system. So you won’t need to actually add them to each node, as long as SSSD is up and running.
Manually create OS users on all nodes and in the KDC (don’t do that, obviously ;P )
Factorio is a computer game. You probably ask yourself, in which ways a computer game is related to this blog? Well, not at all – or is it? Let’s find out.
Basically, in the game you take over the role of a character in 3rd person perspective, whose rocket ship crashed on a foreign planet. You don’t have anything, but a pick axe in the beginning. Your goal is to repair your rocket ship to go home safely. In the course of the game you’ll go from picking resources manually and crafting items manually to building mines, creating items in factories and connecting them using conveyor belts. Later on you even built your own power plants, electric networks and trains. The game is not forcing you to automate everything, but if you didn’t you probably wouldn’t reach your goal in this lifetime. In the game’s “About” section you can find how this goal is supposed to be achieved:
You will be mining resources, researching technologies, building infrastructure, automating production and fighting enemies. Use your imagination to design your factory, combine simple elements into ingenious structures, apply management skills to keep it working and finally protect it from the creatures who don’t really like you.
Does that sound familiar to you? No? – Then read it again and think about it as if it were a very honest job description for an engineering role in a large corporation which just started to “explore” Agile and DevOps methodologies. This is when I started to think about analogies between the game and IT projects.
What the game taught me about IT automation
A lot of those points feel super logical just writing them down, and not even worth mentioning, but then again, why don’t companies start acting on them?
You can only succeed if you keep automating processes, automate those processes that save you the most time at the moment and keep automating what you automated and combine automated processes.
You can’t completely avoid doing and fixing things manually, nor should you. There’s always the aliens living on the planet* destroying your infrastructure and pipelines. In the beginning before you build repair robots, you need to do a lot of manual repair work. Also, keep in mind to not automate everything. Keep doing things manually that don’t actually justify the time you spend automating processes at that certain point of time. You may want to automate those processes later on, but focus on the important (= most repetitive and time-consuming) ones first. *Think about those aliens as an analogy to either software bugs or users or to colleagues who don’t want to move away from waterfall methodology. 😛
If you are not the only one working on a project you need to talk to each other and continuously update each other on your (changing) plans. You need to define interfaces and locations where your infrastructure and processes can interact with the infrastructure and processes of your co-workers.
You can only succeed if you tear down a working implementation to build something more stable and scalable, even if it means that you will invest lots of resources and time. That doesn’t mean that you shouldn’t have built that piece of infrastructure at all. And it also doesn’t mean that the new piece of infrastructure will be there forever.
I’m not sure myself anymore if I am talking about the game or real-life IT. Thus, it seems to be a working analogy. If you know both the game and real-life DevOps methodologies go ahead and post a comment if you can think about something that is missing in my list above.
This analogy is interesting enough to start checking out more analogies of the game. I’ll create one or two future blog posts on those analogies, such as multi-threading and databases.
This is supposed to be a brief aid to memory on how to write marker files, when using “Luigi“, which I explained in a former blog post.
What is a Marker File?
A marker file is an empty file created with the sole purpose of signalizing to another process or application that some process is currently ongoing or finished. In the context of scheduling using Luigi, a marker file signalizes the Luigi scheduler that a certain task of a pipeline has already been finished and does not need to (re-)run anymore.
How the Common Luigi Job Rerun Logic Works
Every Luigi task has a run method. In this run method you can use any sort of (Python) code you desire. You can access the input and output streams of the Task object and use it to write data to the output stream. The principle is that a Luigi Task will not run again, if the file with the filename defined in the output target already exists. This can be either a LocalTarget (local file) or an HDFSTarget (file saved to HDFS) or any other custom target. That’s basically it.
How to Write a Marker File in a PigJobTask
Using a PigJobTask, the idea is that you run a Pig script of any complexity. You define the input and output files in your pig script. In the Luigi pipeline, you basically define the pig script location that you want to run and optionally a few other parameters depending on your Hadoop cluster configuration, but you don’t need to implement the run method anymore.
The scenario is that you do not have access to the HDFS output directory, e.g. because its the Hive warehouse directory or the Solr index directory,… or you simply can’t determine the output name of the underlying MapReduce job. So you need to “manually” create an empty file locally or in HDFS that signalizes Luigi that the job already has successfully run. You can specify an arbitrary output file in the output method. This will not create a marker file yet. The trick is to implement the run method specify explicitly to execute the pig script and do arbitrary stuff, such as creating a marker file, afterwards in the method.
You can see a sample PigJobTask that utilizes this technique below
class HiveLoader(luigi.contrib.pig.PigJobTask):
    '''
    Pig script executor to load files from HDFS into a Hive table
    (can be Avro, ORC,....)
    '''

    input_directory = luigi.Parameter()
    hive_table = luigi.Parameter()
    pig_script = luigi.Parameter()
    staging_dir = luigi.Parameter(default='./staging_')

def requires(self):
    return DependentTask() # requirement

def output(self):
    '''
    Here the output file that determines if a task was run is written.
    Can be LocalTarget or HDFSTarget or ...
    '''
    return luigi.LocalTarget(self.staging_dir + "checkpoint")

def pig_options(self):
    '''
    These are the pig options you want to start the pig client with
    '''
    return ['-useHCatalog']

def pig_script_path(self):
    '''
    Execute pig script.
    '''
    return self.pig_script

def pig_parameters(self):
    '''
    Set Pig input parameter strings here.
    '''
    return {
        'INPUT': self.input_directory,
        'HIVE_TABLE': self.hive_table
    }

def run(self):
    '''
    This is the important part. You basically tell the run method to run the Pig
    script. Afterwards you do what you want to do. Basically you want to write an
    empty output file - or in this case you write "SUCCESS" to the file.
    '''
    luigi.contrib.pig.PigJobTask.run(self)
    with self.output().open('w') as f:
    f.write("SUCCESS")
This is a simple walk-through of an example usage of Luigi. Online there is the excellent documentation of Spotify themselves. You can find all bits and bytes out there to create your own pipeline script. Also, there are already a few blog posts about what is possible when using Luigi, but then – I believe – it’s not very well described how to implement it. So, in my opinion there is either too much information to just try it out or too few information to actually get started hands-on. Also, I’ll mention a word about security.
Therefore, I publish a full working example of a minimalist pipeline from where you can start, copy and paste everything you need
These are the question I try to answer:
What is Luigi and when do I want to use it?
How do I setup the Luigi scheduler?
How do I specify a Luigi pipeline?
How do I schedule a Luigi pipeline?
Can I use Luigi with a secure Hadoop cluster?
What I like about Luigi?
What is Luigi?
Luigi is a framework written in Python that makes it easy to define and execute complex pipelines in a consistent way. You can use Luigi …
… when your data is processed in (micro) batches, rather than it is streamed
… when you want to run jobs that depend on (many) other jobs.
… when you want to have nice visualizations of your pipelines to keep a good overview.
… when you want to integrate data into the Hadoop ecosystem.
… when you want to do any of the above and love Python.
Create Infrastructure
Every pipeline can actually be tested using the --local-scheduler tag in the command line. But for production you should use a central scheduler running on one node.
The first thing you want to do is to create a user and a group the scheduler is running as.
groupadd luigi
useradd -g luigi luigi
The second step is to create a Luigi config directory.
You also need to install Luigi (and Python and pip) if you did not do that already.
pip install luigi
It’s now time to deploy the configuration file. Put the following file into /etc/luigi/luigi.cfg. In this example the Apache Pig home directory of a Hortonworks Hadoop cluster is specified. There are many more configuration options listed in the official documentation.
You are now prepared to start up the scheduler daemon.
sudo su - luigi
luigid --background --port 8088 --address www.example.com --pidfile /var/run/luigi/luigi.pid --logdir /var/log/luigi --state-path /var/lib/luigi/luigi.state'
A Simple Pipeline
We are now ready to go. Let’s specify an example pipeline that actually can be run without a Hadoop ecosystem present: It reads data from a custom file, counting the number of words and writing the output to a file called count.txt. In this example two of the most basic task types are used: luigi.ExternalTask which requires you to implement the output method and luigi.Task which requires you to implement the requires, output and run methods. I added pydocs to all methods and class definitions, so the code below should speak for itself. You can also view it on Github.
import luigi

class FileInput(luigi.ExternalTask):
'''
Define the input file for our job:
The output method of this class defines
the input file of the class in which FileInput is
referenced in "requires"
'''

# Parameter definition: input file path
input_path = luigi.Parameter()

def output(self):
'''
As stated: the output method defines a path.
If the FileInput  class is referenced in a
"requires" method of another task class, the
file can be used with the "input" method in that
class.
'''
return luigi.LocalTarget(self.input_path)

class CountIt(luigi.Task):
'''
Counts the words from the input file and saves the
output into another file.
'''

input_path = luigi.Parameter()

def requires(self):
'''
Requires the output of the previously defined class.
Can be used as input in this class.
'''
return FileInput(self.input_path)

def output(self):
'''
count.txt is the output file of the job. In a more
close-to-reality job you would specify a parameter for
this instead of hardcoding it.
'''
return luigi.LocalTarget('count.txt')

def run(self):
'''
This method opens the input file stream, counts the
words, opens the output file stream and writes the number.
'''
word_count = 0
with self.input().open('r') as ifp:
for line in ifp:
word_count += len(line.split(' '))
with self.output().open('w') as ofp:
ofp.write(unicode(word_count))

if __name__ == "__main__":
luigi.run(main_task_cls=CountIt)
Schedule the Pipeline
To test and schedule your pipeline create a file test.txt with arbitrary content.
We can now execute the pipeline manually by typing
python pipe.py --input-path test.txt
Use the following if you didn’t set up and configure the central scheduler as described above
If you did everything right you will see that no tasks failed and a file count.txt was created that contains the count of the words of your input file.
Try running this job again. You will notice that Luigi will tell you that there already is a dependency present. Luigi detects that the count.txt is already written and will not run the job again.
Now you can easily trigger this pipeline on a daily base by using, e.g., crontab in order to schedule the job to run, e.g., every minute. If your input and output file has the current date in the filename’s suffix, the job will be triggered every minute, but successfully run only exactly once a day.
In a crontab you could do the following:
1 * * * * python pipe.py --input-path test.txt
Security
The cool thing about Luigi is, that you basically don’t need to worry much about security. Luigi basically uses the security features of the components it interacts with. If you are, e.g., working on a secure Hadoop cluster (that means on a cluster, where Kerberos authentication is enforced) the only thing you need to worry about, is that you obtain a fresh Kerberos ticket before you trigger the job – given that the validity of the ticket is longer than the job needs to finish. I.e., when you schedule your pipeline with cron make sure you do a kinit from a keytab. you can check out my answer to a related question on the Hortonworks community connection for more details on that (https://community.hortonworks.com/questions/5488/what-are-the-required-steps-we-need-to-follow-in-s.html#answer-5490) .
What do I like about Luigi?
It combines my favourite programming language and my favourite distributed ecosystem. I didn’t go too much into that now. But Luigi is especially great because of its rich ways to interact with Hadoop Ecosystem services. Instead of a LocalTarget you would rather use HdfsTargets or Amazon S3Targets. You can define and run Pig jobs and there even is a Apache Hive client built in.
This rather long blog entry basically consists of two parts:
In the first part “Motivation” we will learn a few reasons on why to wrap a command line tool (in Python) around an existing REST interface.
If you are not interested in that, but want to know how to build a command line tool skip to the second part – “Ingredients“, “Project Structure” and “Installation“.
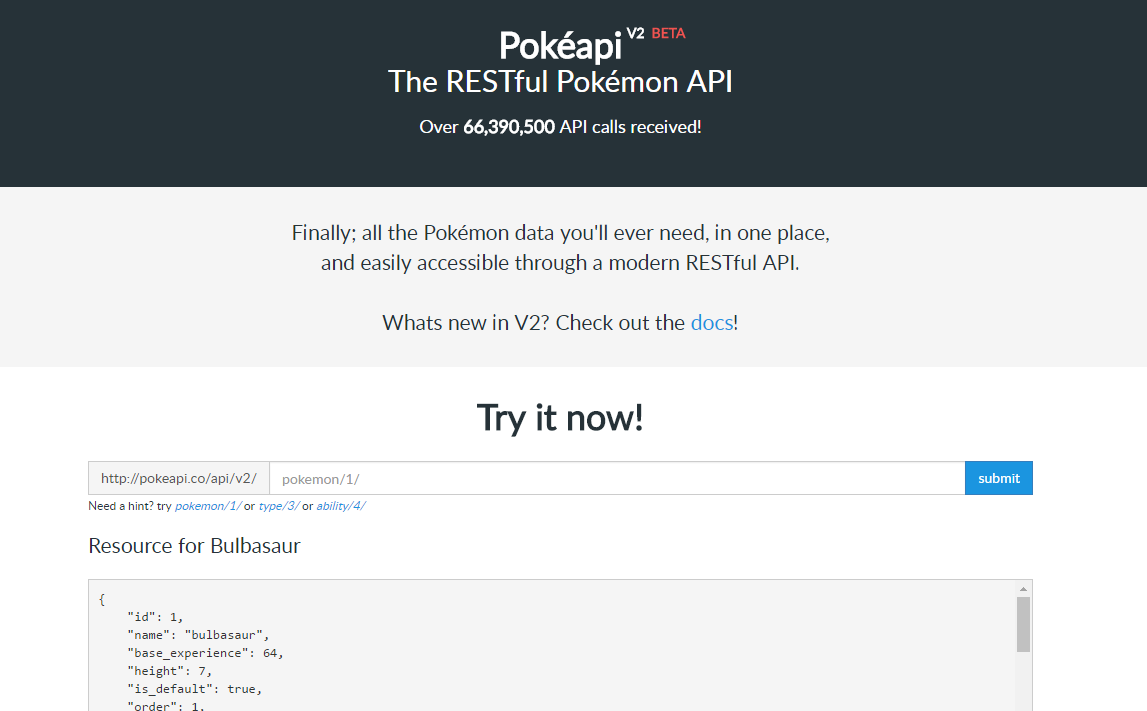
There, we will learn what we need to create a most basic and simple command line tool, that will enable us to query the publicly available Pokéapi which is a RESTful Pokémon API. We will name the tool “pokepy”. It will retrieve the name of a Pokémon from the Pokéapi based on the Pokémon’s number. From there you can go ahead and write a more complex and extensive command line tool yourself with your own custom logic and your own data source API.
Writing a command line tool can be very handy for various reasons – not only to easily obtain Pokémon information. Imagine you have a data source available as RESTful API, such as the Pokéapi. If you wanted to use an API like this just to look up information occasionally, you could put an often quite long query into your browser, fill in the parameters and press enter. The result would show in your browser. Often a REST API exposes more information than you actually need in your daily life and you would need to use your browser search function to get to the data point you need.
You could also use a command line tool like “curl” to query the API, which brings in another advantage. You can now send these requests within a bash script.
curl https://pokeapi.co/api/v2/pokemon/150/
For simple queries like this you could then parameterize the URL by setting it in an environment variable. This is easier to remember as well as easier and faster to type.
Now, why do we want to wrap something like this into a python command line tool, when the above command already looks so easy? There are several reasons:
We are only doing GET requests for now. Other APIs allow you to do all sorts of REST calls (PUT, POST, DELETE), which makes it complex to parameterize using environment variables. Wrapping it into Python logic makes the API once again more accessible and user friendly.
Additionally, a (Python) command line tool proves really useful, when you want to do REST calls against an API, that changes the state of the underlying system.
This is easier to write, read, configure and memorize:
example-tool put state=up

than this:

curl -H 'Content-Type: application/json' -X PUT -d '{state:up}'http://example.com/api/v2/service/
You can put a lot of custom logic into the command line tool to transform data, merge data from two or more different APIs, make calculations and customize the output to be either human or machine readable, or both.
Ingredients
We will be using the docopt module as a command line argument parser, as well as requests to send the request to the Pokéapi. We will also need to have python-pip installed. Python pip can be installed easily via your favourite package manager. On Ubuntu you would do:
sudo apt-get install python-pip

There are many other libraries out there to parse command line arguments or send HTTP requests. This should merely serve as an example.
Project Structure
The minimum requirements on the project structure are the following.

pokepy/
├── pokepy
│  ├── __init__.py
└── setup.py
In my github repo you see a few more files, which are necessary to put the module into the Python Package Index. More on packaging a module can be found here.
The following sections explain and describe the essence of these files:
pokepy/__init__.py
This file serves as the entry point of our command line tool, it is also the required file to specify that this is actually a module and it contains all of our logic. Usually, we would separate these three things, but for simplicity we just keep it in one file. Below you can see the code:
Since we are using docopt, lines 1 to 8 completely define the usage of the command line interface. If an end user does not follow the rules defined in this doc string interface, the usage doc string will be printed to the screen.
The entry point of the script is on line 51.
On line 55 we import the docopt module.
If end users follow the rules defined in the doc string, the command line arguments will be parsed on line 56.
Lines 57 and 58 read out the parsed command line arguments, by calling the two functions on lines 17 and 29.
On line 59 the actual logic of the tool “call_pokeapi(path, id_number)” is called.
call_pokeapi(path, id_number) builds the URL and utilizes the requests module to do the REST call. If the default key “name” exists in the REST call, the value of the json response is returned. If the default key “name” does not exist, the assumption here is that we are out of range of existing Pokemons and therefore receive an error message response. This response has only one key: “detail”. In this case we print out the value of “detail” (which is expected to be “Not found.” 🙂 )
'''
Usage:
    pokepy (pokemon | type | ability) --id=ID

Options:
    -i --id=ID # specify the id of the pokemon, type or ability
    -h --help # Show this help
'''

import requests

POKEAPI = 'https://pokeapi.co/api/v2/{path}/{id}'

def get_api_path(arguments):
    '''
    Get pokemon or type or ability command from command line
    arguments.
    '''
    paths = ['pokemon', 'type', 'ability']
    for path in paths:
        if arguments[path]:
            break
    return path

def get_id(arguments):
    '''
    Get id from command line arguments.
    '''
    return arguments['--id']

def call_pokeapi(path, id_number, key='name'):
    '''
    Call the RESTful PokeAPI and parse the response. If pokemon, ability or
    type ids are not found than the error message detail is returned.
    '''
    url = POKEAPI.format(path=path, id=id_number)
    response = requests.get(url)
    response_json = response.json()
    try:
        res = response_json[key]
    except:
        res = response_json['detail']
    return res

def __main__():
    '''
    Entrypoint of command line interface.
    '''
    from docopt import docopt
    arguments = docopt(__doc__, version='0.1.0')
    path = get_api_path(arguments)
    id_number = get_id(arguments)
    print(call_pokeapi(path, id_number))

setup.py
Now we need to tell Python, that we want to use our module as a command line tool, after installing it. Have a look at the code below:
Lines 1 to 9 are basically boiler plate and don’t do much.
Then the setup method is called with a lot of partly self explanatory and partly boring parameters. What we really need here are the following two parameters:
install_requires where we specify a list of dependencies that will be installed by pip, if the requirements are not already satisfied.
entry_points where we specify an entry point “console_scripts” in a dictionary. The value pokepy=pokepy:__main__ means, that when we call “pokepy” from the command line, the __main__ method of the pokepy module will be called.
'''
pokepy setup module
'''

from setuptools import setup, find_packages
from codecs import open
from os import path

here = path.abspath(path.dirname(__file__))

setup(
    name='pokepy',
    version='0.1.0',
    description='A Pokeapi wrapper command line tool',
    long_description=long_description,
    url='https://github.com/condla/pokepy',
    author='Stefan Kupstaitis-Dunkler',
    author_email='email.address@gmail.com',
    license='Apache 2.0',
    classifiers=[
        'Development Status :: 3 - Alpha'
    ],

    keywords='Pokeapi REST client wrapper command line interface',
    packages=find_packages(),
    install_requires=['docopt', 'requests'],
    extras_require={},
    package_data={},
    package_data={},

    entry_points={
        'console_scripts': [
            'pokepy=pokepy:__main__',
        ],
    },
)

Installation
The only thing that’s left is to install our tool and put it to use. I would recommend you to do it in an own virtual environment, but it is not mandatory. In the project directory do:

# this will create a new virtual python environment in the env directory
virtualenv env
# this will activate the environment (now you can install anything into this environment without affecting the rest of the environment)
source env/bin/activate
# install the pokepy module into your virtual environment
pip install -e .

Congratulations you can now go ahead and use your command line tool for example like this (the $ symbol represents the command prompt):

$ pokepy pokemon -i 25
pikachu

Conclusion
We saw why it is useful to wrap an API into a command line interface and how it is done in Python. Now you know everything to go ahead and create more useful tools with a more complex logic by just extending this module fit to your needs.