In my previous blog I published a video that showed how to query a database table. In the next step I want to show how to enrich this data with data from an external API.
Again: enjoy and don’t forget to ask questions or give me feedback!
Configuration
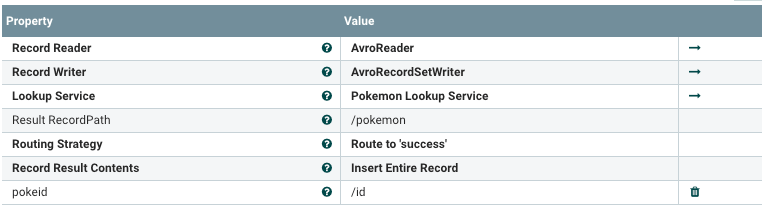
This is how the LookupRecord processor is configured
This is how the RESTLookupService (Pokemon Lookup Service) is configured:
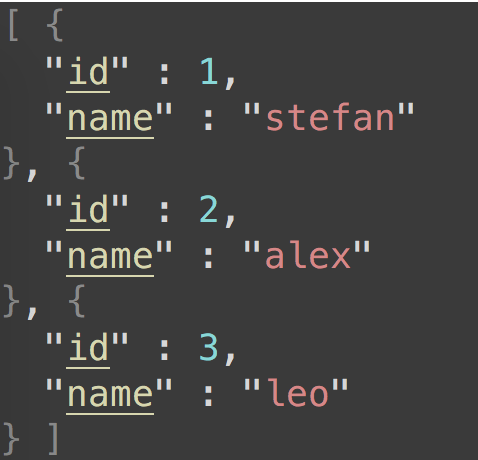
This is the expected input after the QueryDatabaseTableRecord before the LookupRecord processor:
This is an expected output example after the LookupRecord processor:
Apache NiFi is part of the Hortonworks Data Flow (HDF) product and manages data flows. The Raspberry Pi is a small, open source, multi-purpose computer. If you are not familiar with one or more of these products, just follow the links for more information. 🙂
Hardware and Software Specifications
Hardware: Raspberry Pi 2.
Operating System: Raspbian version March-2016 (Download).
should work out of the box, but for me only this works without further modifications:
/etc/init.d/nifi start
After starting, I tried to access the Web Interface, but it didn’t work. I checked the logs, but everything seemed alright. I saw something like the following in the nifi-bootstrap.log
2016-04-02 21:06:29,563 INFO [NiFi Bootstrap Command Listener] org.apache.nifi.bootstrap.RunNiFi Apache NiFi now running and listening for Bootstrap requests on port 47094
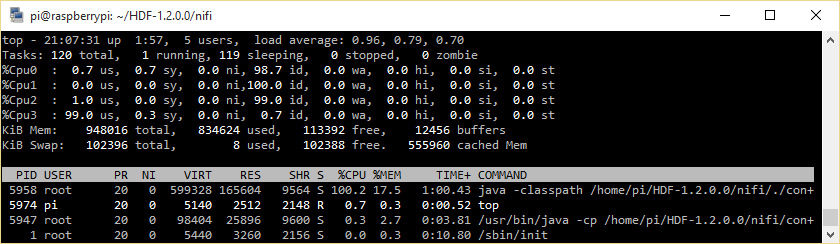
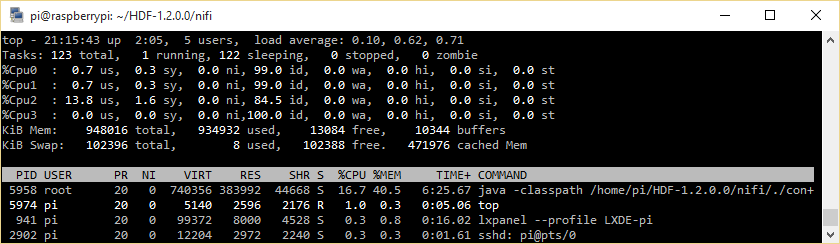
After 6 minutes and 3 seconds, the web interface was available though. As you can see in the screenshot below HDF takes 100% of one core of the RasPi during the start up process:
The HDF start-up process occupies one full core of the RasPi
After the webserver is up and running, NiFi’s resource usage looks more moderate:
NiFi needs about 16.7% of (400% of) CPU and almost 40.5 % of the RasPi’s RAM
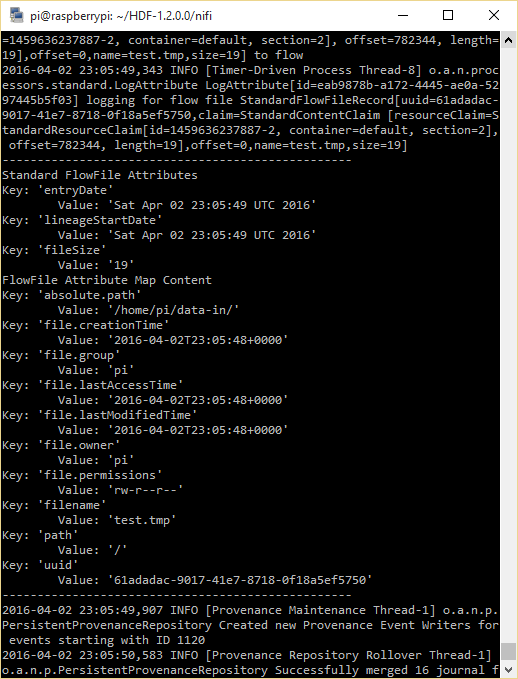
I followed the “Getting Started” where NiFi is configured to have two processors, one of which reads files from the disk, sends them to the other processor and deletes them. The other processor just receives the files and logs their information to the nifi-app.log. Although the name of the processor “LogAttribute” is quite obvious, the official documentation does not provide a description on what it actually does. I found this amazing blog post on a www.nifi.rocks, where quite a lot of processors are described.
Writing a file, then being deleted by the NiFi GetFile processor 100000 times, then …
…, then getting transfered to the LogAttribute processor, and finally …
… finally the LogAttribute processor logs the incoming FlowFile data in the nifi-app.log.
Conclusion
NiFi is as easy to install on a Raspberry Pi as anywhere else and sticks out with all of its features, being complex but not complicated. I did not test a lot of different processors on the RasPi nor did I test this simple setup with large amounts of data, but even in its simplicity the possibilities are endless. Combining the power and easy of use of the RasPi’s GPIOs with NiFi’s power and simplicity to direct and redirect data (flows), practically every child can, e.g., send temperature sensor data into a Hadoop File System and even process and filter it on its way.