Big Data and Stream Processing 101 – Part 1: Overview of Tools and Frameworks

While the number of tools in the Open Source Big Data and Streaming Ecosystem still grows, frameworks that are around for a long time become highly mature and feature rich, some may say “enterprise ready”. Thus, it’s not surprising to me to see a lot of my customers who are new to the whole ecosystem are struggling understanding the basics of each of these tools. The first question always is, “When do I use which tool?”, but this is often not enough without having seen a certain tool in action.

This and a tweet that I recently stumbled upon, were motivation enough for me to explain the most basic things you can do with these tools. Each future blog post will contain a description of the most basic operation of exactly one tool and a detailed explanation of this and only this basic operation and none of the advance features, that might confuse beginners.

One motivation for me to write this blog post.

In this first blog post of the series, I want to categorise the tools – as good as possible – and describe each of them with as few words as possible, ideally less than a full sentence. Then I’ll introduce each of these tools in arbitrary order in subsequent blog posts. This should help anybody get started and then attend trainings or do self study to get to know all the features that are supposed to make our lives easier processing and managing data, and lower the barrier to get started with each of these.

Disclaimer: this overview is highly opinionated, most probably biased by my own experience and definitely incomplete ( = not exhaustive). I’m definitely up for discussion and open for questions on why I put a certain tool into a certain category and why certain categories are named as they are. So don’t hesitate to reach out to me 🙂

Tools and Frameworks

I’m re-using the slides that I recently created for a “lunch and learn” session. You’ll notice that a lot if not all of the tools appear in multiple categories.

( ) parentheses mean that I had some issues and spent some time considering if I really would put this tool in a certain category, because it strictly doesn’t fit. I probably put it there, because it *can* be used or it is often *used in combination* with tools in this category.

[ ] parentheses mean that the tool is not very popular anymore. It might still be supported, highly used and mature, but is just not popular anymore and likely to fade away and being replace by another tool.

All – Categorized by Function

“All” doesn’t mean every past and future existing tool in the ecosystem. All in this article means just all the tools that I consider and that are available in one of the distributions of HDP, CDH or the new Cloudera Data Platform (CDP)

Note: “Technical Frameworks” are not frameworks you’d work with on a daily base or at all. They’re just there and enable the rest of the cluster to work properly or enable certain features. All of the frameworks/tools/projects in this category are very different from each other.

Processing – Categorised by Speed of Data

Here “Data at Rest” means, that data could possibly be old, historic data, while “Streaming Data” considers event based/stream processing – processing of data while it’s on it’s why from creation at the source to the final destination. The final destination could be a “Data at Rest” persistence engine/database.

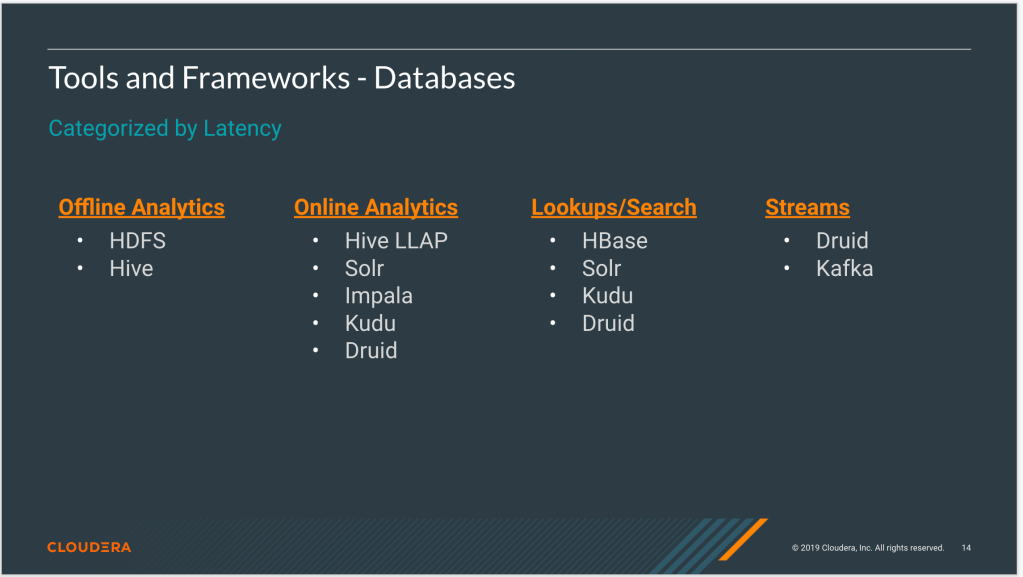
Databases – Categorised by Latency

Latency here could refer to two different things:

  • How up-to-date the data in the database is
  • How long a query to the database takes to respond with the results

I don’t distinguish those two in this categorisation, which would make this exercise a bit too detailed and tedious. Generally, it’s important to consider both to choose an adequate database for a certain use case.

All – Categorised by Use Case

I chose four typical use cases for this categorisation. A lot of other use cases can be realized

List of All Tools and Frameworks

Again, “All” doesn’t mean all tools currently available in the open source big data ecosystem. “All” means the bulletproof, tested, compatible set of components that easily cover the most common Big Data and Streaming use cases.

Apache NiFi: Manage data flows; get data from A to B and process it on the way with a UI

Apache Spark: Use dataframes to extract, transform and load data, train and evaluate ML models.

Apache Kafka: Publish, persist and subscribe to events

Cloudera Data Science Workbench: Explore data; use Python and Spark; deploy and manage ML models

Apache Hive: Data Warehousing engine; SQL on distributed/object storage

Apache Impala: Data Hub engine; SQL on distributed/object storage

Apache Kudu: Quickly analyse fast data

Apache Oozie: Schedule jobs

Apache Sqoop: Transfer data from and to relational databases

Apache Druid: Analyse realtime data with high performance

Apache Solr: Index and search text

Apache Flink: Process streams of data using a programming interface

Apache Storm: Process streams of data using a programming interface

Apache HBase: Consistent, scalable noSQL database; low latency look-ups; unstructured data

Apache Phoenix: Do SQL on top of HBase

Apache Zeppelin: Notebook application tightly integrated with Hive and Spark

Apache Ranger: Define policies to permit or restrict access to data

Apache Knox: Manage access to services

Apache Atlas: Manage meta data

Part 2: How to Create a Simple Ranger Policy

How to Troubleshoot an Apache Storm Topology

Apache Storm is a real-time, fault-tolerant, event-based streaming framework and platform that runs your code in a highly parallelized way on distributed nodes. It’s all about Spouts (processing units to read from data sources) and Bolts (general processing units). Storm is often used to read data from Apache Kafka and write the results back to Kafka or to a data store. Apache Storm and Apache Kafka are the work horses of the cyber security platform Apache Metron. Storm is also being used internally by the Streaming Analytics Manager (SAM)

This article guides you through the debugging process and points you to the places you need to tweak your configuration to get your topology up and running in a kerberized environment in case certain errors occur. For basic information on how to authenticate your application check out the reference implementation by Pierre Villard on his Github page.

Prerequisites

I assume that you start from a certain point:

  • Your Storm cluster and the services you communicate with (Kafka, Zookeeper, HBase) is up and running as well as secure, i.e., the authentication happens through the Kerberos protocol.
  • Your Storm cluster is configured to run topologies as the OS user corresponding to the Kerberos principal who submitted the topology. (See: “Run worker processes as user who submitted the topology” in the excellent article of the Storm documentation)
  • Your topology (written in Java) is ready to be deployed and authentication is put in place.

Debugging Process

  • Use the Storm UI to check if the topology’s workers are throwing any errors and on which machine they are running! The worker’s log files are stored on the machine the worker is running in /var/log/storm/workers-artifacts/<topology-name><unique-id>/<port-number>/worker.log.
  • Check the input data and output data of your Storm topology. In case you are using Kafka, connect via the Kafka console consumer and read from the input and the output topic of your topology! If you don’t see any events in the input Kafka topic, you should check upstream for errors. If you do see input events, but no output events, refer to your topology logs described in the item above. If you do see output events, check if they have the expected format (data format, number and kind of fields are correct, fields contain data that makes sense as opposed to null values)
Screen Shot 2018-07-16 at 19.49.37
# List Kafka topics:
bin/kafka-topics.sh --zookeeper <zookeeper.hostname>:<zookeeper.port> --list

# print messages as they are written on stdout from input topic
bin/kafka-console-consumer.sh --bootstrap-server <kafka.broker.hostname>:<kafka.broker.port> --topic input

# print messages as they are written on stdout from output topic
bin/kafka-console-consumer.sh --bootstrap-server <kafka.broker.hostname>:<kafka.broker.port> --topic output


Possible Error Scenarios

Authentication Errors Exception

Caused by: javax.security.auth.login.LoginException: Could not login: the client is being asked for a password, but the Kafka client code does not currently support obtaining a password from the user. not available to garner authentication information from the user

Your topology is being submitted and the supervisor tries to start and initialize the Spouts and Bolts in the worker process based on the configuration you provided. When this error occurs the worker process is killed and the supervisor tries to spawn a new worker process. On the machine the worker is supposed to run, you can see a worker process popping up with a certain PID (ps aux | grep <topology_name>). A few seconds later this process is killed and a process exactly as the old one is started with a different PID. You can also tail the worker log and see this error message. Soon afterwards the “Worker has died” message appears. This can happen for various reasons:

  • The OS user running the topology does not have the permission to read the keytabs configured in the jaas config file. Check with ps aux or top which user is running and check if the keytab has the correct POSIX attributes. Usually it should be read-only by the owning user (-r– — — <topology-user><topology-user>)
  • The jaas configuration points to the wrong keytabs to be used for authentication and the OS user does not have permission to those. Check with ps aux which jaas file is configured. You might find an option there. Check if this jaas config file has the desired authentication options configured. If not configure your own and pass it to the topology.
-Djava.security.auth.login.config=/etc/storm/conf/client_jaas.conf

Book Review: Learning Responsive Data Visualization

This post is about describing my experiences reading a book: “Learning Responsive Data Visualization” by Christoph Körner.

What is it all about?

The book aims to explain the concepts and application of responsive data visualization technologies. It describes the famous CSS framework from Twitter “Bootstrap“, SVG graphics and the JavaScript visualization framework D3.js.

The book has 9 chapters: starting from a short introduction of the components in use, it quickly enables the user to create their first visualization and increases the level of detail and complexity systematically. Later, it describes a combined usage of these components and presents techniques on how to create more elaborate layouts and animations.

In the end,  the book motivates and explains how to test visualization applications, as well as outlines how to solve cross-browser issues.

About the Author

From Amazon

Christoph Körner, CTO and lead developer at GESIM, a start-up company, is a passionate software engineer, web enthusiast, and an active member of the JavaScript community with more than 5 years of experience in developing customer-oriented web applications. He is the author of Data Visualizations with D3 and AngularJS and is currently pursuing his master’s degree in Visual Computing at Vienna Institute of Technology.

My opinion

Christoph uses short, concise descriptions. Instead of being verbose, he yields many links for further reading to official documentation or interesting blog entries by utilizing non-invasive text boxes throughout the chapters. The author understands how to direct the reader’s attention at the important parts of the technologies introduced.

Nevertheless, here and there, the author finishes a section with an outlook to an advanced topic that sometimes could have needed a little closer attention. An example of this can be found at the end of chapter 2, when the author mentions, that “D3 provided more useful methods on the generator functions”. He then names only one such method and describes it in one sentence. More useful would have been a small list of these methods or to provide yet another of the excellent code examples in the book.

What I really enjoyed is that the author follows the title of the book closely and visualizes not only the code examples but also graphically depicts the concepts and philosophy of the frameworks in use. This helped me a lot to understand the ideas.

One of the most important things of a textbook is to be simple and comprehensible. Christoph easily reaches these goals.

responsive_data_vis

Audience

In my opionon, you need some level of experience with HTML, CSS and JavaScript before you can get started.
Thus, I believe the book aims at developers of intermediate level. On the other hand, if you bring these prerequisites this book is aimed at beginners of D3.js.

Conclusion

At Amazon I rated the book with 4 stars: While I mentioned above, that I like that it is completely fact based and content focused, I kind of miss to get some historical information or funny side stories in footnotes or fact boxes. Instead, fact boxes are used efficiently to point to additional technical content. There are some rare 5-star-books out there that achieve to create this fine bridge of being educational and entertaining. “Learning Responsive Data Visualization” does not build this bridge, but delivers a solid book to teach yourself and others modern responsive data visualization.

How to Create a Data Pipeline Using Luigi

This is a simple walk-through of an example usage of Luigi. Online there is the excellent documentation of Spotify themselves. You can find all bits and bytes out there to create your own pipeline script. Also, there are already a few blog posts about what is possible when using Luigi, but then – I believe – it’s not very well described how to implement it. So, in my opinion there is either too much information to just try it out or too few information to actually get started hands-on. Also, I’ll mention a word about security.

Therefore, I publish a full working example of a minimalist pipeline from where you can start, copy and paste everything you need

These are the question I try to answer:

  • What is Luigi and when do I want to use it?
  • How do I setup the Luigi scheduler?
  • How do I specify a Luigi pipeline?
  • How do I schedule a Luigi pipeline?
  • Can I use Luigi with a secure Hadoop cluster?
  • What I like about Luigi?

What is Luigi?

Luigi is a framework written in Python that makes it easy to define and execute complex pipelines in a consistent way. You can use Luigi …

  • … when your data is processed in (micro) batches, rather than it is streamed
  • … when you want to run jobs that depend on (many) other jobs.
  • … when you want to have nice visualizations of your pipelines to keep a good overview.
  • … when you want to integrate data into the Hadoop ecosystem.
  • … when you want to do any of the above and love Python.

Create Infrastructure

Every pipeline can actually be tested using the --local-scheduler tag in the command line. But for production you should use a central scheduler running on one node.

The first thing you want to do is to create a user and a group the scheduler is running as.

groupadd luigi
useradd -g luigi luigi

The second step is to create a Luigi config directory.

sudo mkdir /etc/luigi
sudo chown luigi:luigi /etc/luigi

You also need to install Luigi (and Python and pip) if you did not do that already.

pip install luigi

It’s now time to deploy the configuration file. Put the following file into /etc/luigi/luigi.cfg. In this example the Apache Pig home directory of a Hortonworks Hadoop cluster is specified. There are many more configuration options listed in the official documentation.

[core]
default-scheduler-host=www.example.com
default-scheduler-port=8088

[pig]
home=/usr/hdp/current/pig-client

Don’t forget to create directories for the process id of the luigi scheduler daemon, the store log and libs.

sudo mkdir /var/run/luigi
sudo mkdir /var/log/luigi
sudo mkdir /var/lib/luigi
chown luigi:luigi /var/run/luigi
chown luigi:luigi /var/log/luigi
chown luigi:luigi /var/lib/luigi

You are now prepared to start up the scheduler daemon.

sudo su - luigi
luigid --background --port 8088 --address www.example.com --pidfile /var/run/luigi/luigi.pid --logdir /var/log/luigi --state-path /var/lib/luigi/luigi.state'

A Simple Pipeline

We are now ready to go. Let’s specify an example pipeline that actually can be run without a Hadoop ecosystem present: It reads data from a custom file, counting the number of words and writing the output to a file called count.txt. In this example two of the most basic task types are used: luigi.ExternalTask which requires you to implement the output method and luigi.Task which requires you to implement the requires, output and run methods. I added pydocs to all methods and class definitions, so the code below should speak for itself. You can also view it on Github.

import luigi

class FileInput(luigi.ExternalTask):
'''
Define the input file for our job:
The output method of this class defines
the input file of the class in which FileInput is
referenced in &quot;requires&quot;
'''

# Parameter definition: input file path
input_path = luigi.Parameter()

def output(self):
'''
As stated: the output method defines a path.
If the FileInput  class is referenced in a
&quot;requires&quot; method of another task class, the
file can be used with the &quot;input&quot; method in that
class.
'''
return luigi.LocalTarget(self.input_path)

class CountIt(luigi.Task):
'''
Counts the words from the input file and saves the
output into another file.
'''

input_path = luigi.Parameter()

def requires(self):
'''
Requires the output of the previously defined class.
Can be used as input in this class.
'''
return FileInput(self.input_path)

def output(self):
'''
count.txt is the output file of the job. In a more
close-to-reality job you would specify a parameter for
this instead of hardcoding it.
'''
return luigi.LocalTarget('count.txt')

def run(self):
'''
This method opens the input file stream, counts the
words, opens the output file stream and writes the number.
'''
word_count = 0
with self.input().open('r') as ifp:
for line in ifp:
word_count += len(line.split(' '))
with self.output().open('w') as ofp:
ofp.write(unicode(word_count))

if __name__ == &quot;__main__&quot;:
luigi.run(main_task_cls=CountIt)

Schedule the Pipeline

To test and schedule your pipeline create a file test.txt with arbitrary content.
We can now execute the pipeline manually by typing

python pipe.py --input-path test.txt

Use the following if you didn’t set up and configure the central scheduler as described above

python pipe.py --input-path test.txt -local-scheduler

If you did everything right you will see that no tasks failed and a file count.txt was created that contains the count of the words of your input file.

Try running this job again. You will notice that Luigi will tell you that there already is a dependency present. Luigi detects that the count.txt is already written and will not run the job again.

Now you can easily trigger this pipeline on a daily base by using, e.g., crontab in order to schedule the job to run, e.g., every minute. If your input and output file has the current date in the filename’s suffix, the job will be triggered every minute, but successfully run only exactly once a day.

In a crontab you could do the following:

1 * * * * python pipe.py --input-path test.txt

Security

The cool thing about Luigi is, that you basically don’t need to worry much about security. Luigi basically uses the security features of the components it interacts with. If you are, e.g., working on a secure Hadoop cluster (that means on a cluster, where Kerberos authentication is enforced) the only thing you need to worry about, is that you obtain a fresh Kerberos ticket before you trigger the job – given that the validity of the ticket is longer than the job needs to finish. I.e., when you schedule your pipeline with cron make sure you do a kinit from a keytab. you can check out my answer to a related question on the Hortonworks community connection for more details on that (https://community.hortonworks.com/questions/5488/what-are-the-required-steps-we-need-to-follow-in-s.html#answer-5490) .

What do I like about Luigi?

It combines my favourite programming language and my favourite distributed ecosystem. I didn’t go too much into that now. But Luigi is especially great because of its rich ways to interact with Hadoop Ecosystem services. Instead of a LocalTarget you would rather use HdfsTargets or Amazon S3Targets. You can define and run Pig jobs and there even is a Apache Hive client built in.