In order to continue the series “Big Data and Stream Processing 101”, I created a little video to show the most basic operation of Apache Ranger: Apache Ranger can do much more, but the most basic operation is creating a single policy for a single resource and a single user.
It’s not best practice to give single users access to certain resources. For productive setups you’d look more into giving certain roles access to certain resources or tags. But that’s not being discussed here.
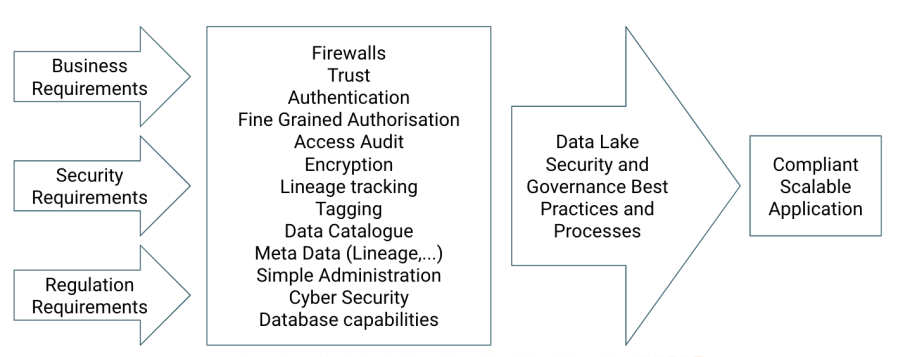
The initial idea of so-called data lakes was to be able to process, transform and dig through huge data sets of unstructured, semi-structured and structured data. It was fairly simple. You put your data set on a Hadoop Distributed File System cluster, you wrote one or multiple MapReduce jobs, which parallelised the processing steps to retrieve the results you were aiming for. Nowadays, it’s not that simple any more, since the number of data bases, tools and frameworks, which are supposed to make this work easier, but also more secure, grew rapidly. This article is a side product of a talk I gave for a Cloudera Foundation project and depicts the history of Data Security and Data Governance. I start in Wild West like scenarios, in which data lake security was neither an option nor a requirement and nobody actually talked about data governance yet. In the course of this article we walk through different epochs to the present describing state-of-the-art capabilities of data lakes for companies to make as sure as possible that neither their data lakes are being breached, nor Personally Identifiable Information (PII) is leaked. The epochs I’m describing are just like the real Stone Age, Bronze Age, Iron Age,… – very dependent on the location, some regions are further developed, some regions are slower but may skip eras. Hence, the estimated time windows are only vaguely defined.
Data Lake Stone Age (5-15 Years Ago)
In the beginning, a lot of companies had one or a few huge data sets for mostly one or a few single use cases. The only way of securing this data was a firewall to block users from having access to the cluster. If you had network access to the cluster, you had access to the data on the cluster. Or in other words: there was nothing else that prevented users from accessing the data anonymously, but the firewall. For some companies or departments, especially smaller ones, this was acceptable, it was fairly easy to implement and it was based on mutual trust between the stakeholders, the data owners and users of the data platform.
Trust as a Security Measurement is Simply Not Enough
This approach was a good – and the only – way to kick off the project “data lake”. As the number of data sets grew on the data lake, the number of stakeholders grew and suddenly – oh surprise – the concept of mutual trust as a security measurement began to fail. Not only was it impossible that all users would know each other so well, as to trust each other, two more risks are always introduced, when multiple people work together: human failure, and conflict of interests. It soon became a requirement to build “secure” data lakes.
I remember being at a data conference and I listened to a talk about data infrastructure. They explained all the fancy stuff they were doing, emphasised multi-tenancy and high flexibility and scalability and a few other buzzwords. At the end of the talk there was a question from the audience: “How do you do all of this with ‘Security enabled’?“. The answer: “Well, we don’t have ‘Security enabled’ on our data platform.” That was 2016.
Bronze Age: What does “Secure” Actually Mean? (4-10 Years Ago)
The basic idea of securing a cluster is to grant access of certain persons to certain data sets and restrict access to others. Almost every database technology comes with one or more ways to define policies that enable the administrator to define who can access which data set within this database. This is known as authorisation. The issue here is that you still need a mechanism to prove to the database system who you are. This is known as authentication. Usually this involves a username and a password to match. This sounds simple, but working on scalable, distributed systems this causes complex challenges that have been solved in different ways, one of the most wide-spread and at the same time oldest mechanisms leveraged to implement authentication on data lakes is the Kerberos protocol.
Becoming Compliant was Possible – Not Easy
At that time, we could authenticate ourselves and access data that we were authorised to use. So, what else did we actually need? Especially in – but not limited to – the financial services industry, it was always a requirement to keep an access log, answering the questions of who was reading data or writing data and when that happened. Most database systems can deliver on that. In the meantime, the world of (open source) databases and data storage engines got quite complex and manifold. There’s a data storage system for each use case you could possibly think of: Do you need to archive raw data at a cheap rate and keep it available for processing later? Do you want to do simple, yet low-latency lookups of certain key words and retrieve information associated with these? Do you want to be able to full-text search documents? Do you want to do SQL queries that are not time critical or rather implement real time dashboards? All of those use cases require your data to be stored in different database systems, sometimes the same data is stored multiple times differently in multiple different database systems following the so-called polyglot persistence architecture. All of those different systems have a way of authentication, authorisation and audit and all of them work similarly, but are more or less different. And exactly this makes it insanely complicated to administrate: they are many different systems with their own implementation of “Security”.
One Service to Secure them All – Problem Solved!?
Retrospectively, the next possible development was as necessary, as it is now obvious. We needed services that could administrate authorisation and collect audit logs in a single point. The development of tools, such as Apache Ranger and Apache Sentry was initiated. It was suddenly easier and more scalable to manage role based security access policies across multiple database systems, also referred to as role based access control (RBAC).
Iron Age: Why Data Lakes are not Necessarily Like Wines (1-6 Years Ago)
While security was one problem that seemed to be fixed, companies wanted to answer more questions about their data – especially because the risk of losing data or data in a data lake becoming worthless was imminent, if they didn’t. These questions were:
Where does my data come from? (Lineage)
What are the processing steps of the data I’m using?
Who owns the data I’m using?
Who is using the data I own?
What is the meaning of the data sets available in a data lake?
If you couldn’t answer these questions, while you were still on-boarding new data sources on a daily base and continuously granted data access to new people, you soon had a problem. You had a data swamp. [Play ominous music in the background while reading the last sentence].
A data swamp is a deteriorated and unmanaged data lake that is either inaccessible to its intended users or is providing little value.
Data Lakes are less like wines, that become better with age, but more like relationships, that become better if you take care of them. [At least that’s what people who have friends tell me].
The Toolset is Expanded and New Roles Emerge
Similar to the Iron Age which is marked as the time when humans started to create superior tools made out of iron, the Iron Age for data lakes starts in your company, when you can answer the questions above efficiently, correctly and in a scalable way. Much as in the Iron Age, this requires appropriate tooling that hasn’t been there before. One of those tools emerging in the Open Source world was Apache Atlas. It started rudimentarily, but grew rapidly with the companies’ requirements. In the beginning you could tag data stored in a few data storage systems and display their linage. Later, the number of supported systems grew due to open standards and the meta data categories you could assign were expanded. A demand for a new role emerged, the data steward, a person, who is responsible to make sure meta data questions around a data lake can be answered at all times. Unfortunately, the name of the role sounds as boring as the role is important.
Next Level: Producing Steel in the Iron Age
After reading through a few of the previous paragraphs, I think you get the hang of it: The number of data sets grows again, the number of users grows again and as a result new problems emerge: we reached a point now, where it is simply painful to manage security policies and at the same time keep track of them. At this point there might be hundreds of policies per database, each policy matching a certain role/group with a certain data resource. This new challenge required new capabilities of a modern data platform and similar to the Habsburg success strategy “Tu felix Austria nube”, security and tagging capabilities were married. Henceforth, it was possible to create tag based policies, and thereby reducing the number of security policies by orders of magnitude.
One More Problem to Solve
An issue that hasn’t been discussed specifically in this article yet, but should be mentioned: encryption. There’s two types of encryption:
“Wire Encryption”: SSL/TLS encryption we face every day in our browser windows, when we visit a website with the prefix https – as opposed to http – “s for secure”. This is called wire encryption, encrypting the communication between two servers and I’m not going to explain here why this is important. This was done multiple time on the internet, e.g., here.
“Encryption at rest” describes data persisted in any storage system, e.g. a local hard drive, a distributed file system or any database system. Especially in times where you might not take care of your own infrastructure (data center, cloud vendor,….), encryption at rest makes sure, that those who administrate the infrastructure and possibly assign policies cannot actually use the data. The encryption key stays with the designated user or is managed on separate Key Management Servers (KMS) to guarantee that only those who are allowed to use the data (beyond policy assignment) can see the data.
Medieval Times: How to Deal with Regulations and External Policies (0-3 Years Ago)
One might ask themselves, why I would compare the time of regulations and governmental policies with the medieval times, often known as the dark ages. One good analogy is that, we have most of the required tools available from earlier times, but we are just not using them. And this is were the analogy ends already: the reasons of not leveraging technology in the medieval times were very different ones…
Let’s recapitulate what we have so far:
Growing number of data sets
Growing number of users
Polyglot persistence
A set of tools to address security challenges
A set of tools to address governance challenges
On top of this, new regulations such as the General Data Protection Regulation (GDPR) pose new challenges. An overly brief and overly simplified summary of what GDPR means for a data lake can be found below:
We need the consent to the processing of people’s personal data.
We need to fulfill contractual obligations with a data subject, i.e.,
provide information to the data subject in a concise, transparent, intelligible and easily accessible form,
delete any data subject related data on request.
We need to protect the vital interests of a data subject or another individual through
pseudonymisation or tokenisation,
keeping records of processing activities,
and securing of personal data.
A solution to this is, on the one hand following best practices as well as establishing processes on the data lake using the existing tools. On the other hand, the solution is very individual. Similar to designing a data application based on certain business requirements, we need to make security and privacy considerations specific for this use case part of these requirements. Example: if a certain data set contains PII that could possibly be presented to the outside, we have multiple options. For example, we could use a storage engine that supports tokenisation of certain fields of PII. If the storage we need to use to deliver our use case requirements does not support tokenisation, then we would need to make sure to tokenise, anonymise or encrypt those fields at the time of data ingestion. If,… – I hope you get the idea. It’s important to look closely into your requirements and then carefully architect a solution based on the capabilities of the data platform and the processes you put in place.
Best Practices to Become and Stay Compliant
Above mentioned best practices and processes can be summarised as:
Establish processes to manage
consent,
transparency and intended usage,
automatic processing of personal data.
Leverage dynamic masking and access control: use roles, tags, location and time to restrict access.
Use the tools and its capabilities mentioned in this article efficiently.
Become a user and customer-centric organisation: Design your applications with your customers as your most important asset. This makes it easier for you to manage and delete customer related data (and to make your customers happy as a side effect).
Renaissance: No System is 100% Secure (0-2 Years Ago)
This article focused on how to prevent data breaches and make it as difficult as possible for people with malicious intent to get access to data they shouldn’t have. However, what can go wrong will go wrong and even if we try our best, we are still human beings. We all do mistakes and since (personal) data is highly valuable, which is the main reason we take so many different measurements in the first place, there will always be people who want to get this data to use and abuse it. There’s no system yet to protect us from social engineering and data breaches happen on a regular base. In addition to that, the “Internet of Things” (IoT) adds a higher attack surface (= number of possibilities to enter a system without permission) than ever before.
Therefore, it’s mandatory to work closely with our cyber security colleagues to be able to detect breaches and respond to them as soon as possible as well as to have a good backup and disaster recovery plan. Modern data lakes are commonly built using the very same technology that powers their business use cases to also power their cyber security and threat hunting efforts.
I’ve worked quite a bit with Apache Metron, a cyber security platform running on a data lake. and written quite a bit about it on this blog.
The Future: New Regulations and Governmental Policies and Technology
The number of governmental regulations will grow in the future and they will be very specific to specific countries. Some kind of data is not allowed to leave certain countries. Some kind of data will always be inspected by certain governments, when it leaves the country. New and additional data privacy and governance regulations will be published as the existing ones are being tested in the wild. More requirements always means more complexity. This shouldn’t worry you, since you know your data platform and it’s databases, it’s security capabilities, as well as it’s data governance capabilities. Furthermore, you have well educated data architects and engineers who not only know how to translate business requirements into a data architecture, but also security requirements and governance requirements of internal and external regulations and policies into the same data architecture.
Framework to overcome security and data governance challenges.
I’m also pretty sure, that there will be regulations that will bring challenges that will be difficult to overcome – if not impossible at that time. The beautiful thing is that all companies (that are affected by this regulation) will face this challenge and they might find their specific ways to overcome those challenges, or – and that’s what happened multiple times in the past – companies work together on open source software to overcome those challenges together.
I Barely Used the Word “Cloud” in this Article! What’s Wrong with me?
Cloud is just one (major) option to store and process the data and provides challenges as well as opportunities. Your cloud provider of choice might not have a data center in the country you produce the data (= challenge). You might not have a data center in the country you produce the data, but the cloud provider has (= opportunity). Basically, treat cloud as part of your tool set to solve challenges and use it as you would use every tool, knowing that it has advantages and drawbacks.
Outlook
This article described roughly the history of security and data governance of data lakes (as far as you can put those items on a strict timeline). Each of those historic additions to the data lake security and governance ecosystem are essential building blocks and tools and all of them are still as relevant as at the time of their introduction. It’s up to you to put them to use and leverage all of their capabilities to make your life easier and your data more secure, manageable and compliant.
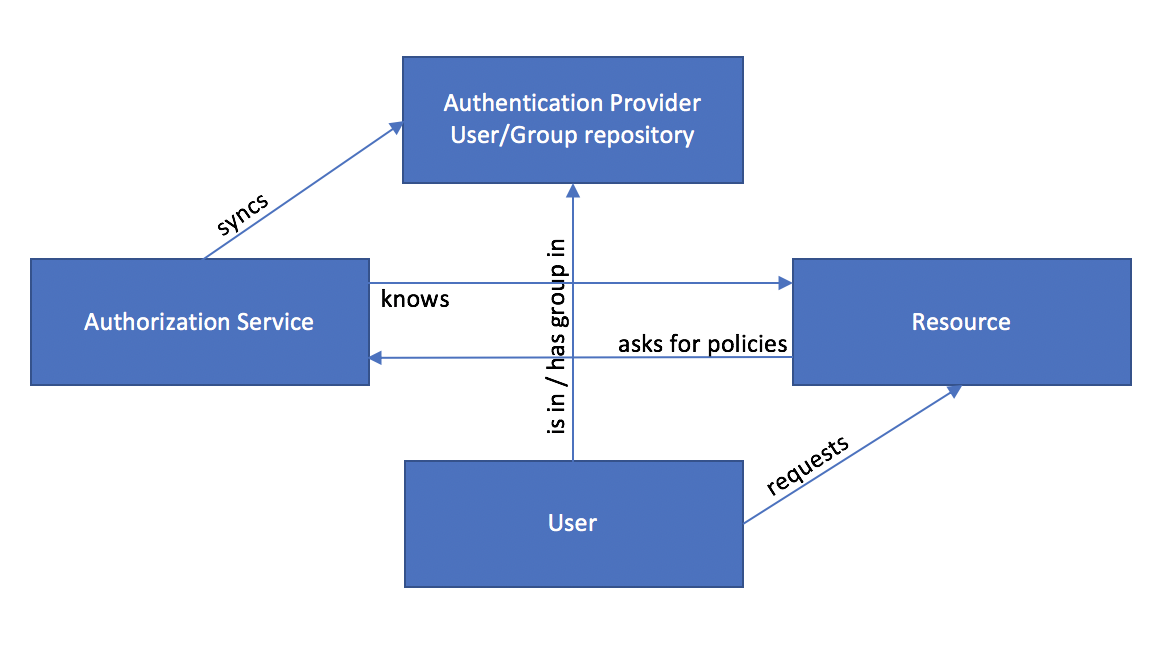
The answer to this question is resource based authorisation. Everybody is familiar with resource based authorization. It’s about managing a set of policies for all resources, i.e., databases, tables, views, columns, processes, applications and others. That means whenever you create a new resource, you need to create a new policy that matches this resources with users or groups and assigns adequate permissions to them.
In resource-based authorization security policies match resources with users/groups.
Thus, authorization services must be aware of the resources (from a specific resource providing service) as well as users and groups (usually from an authentication provider, such as an Active Directory).
The Process
The authorization service connects to the resource-providing service to be aware of the resources. The service typically knows which types of permission the specific resources allow for. In the diagram below you see a simplified process of how resource based authorization typically works and how the “stakeholders” interact.
Typical components and interactions involved in resource based authorization
In the Big Data landscape the de-facto standard authorization service is Apache Ranger.
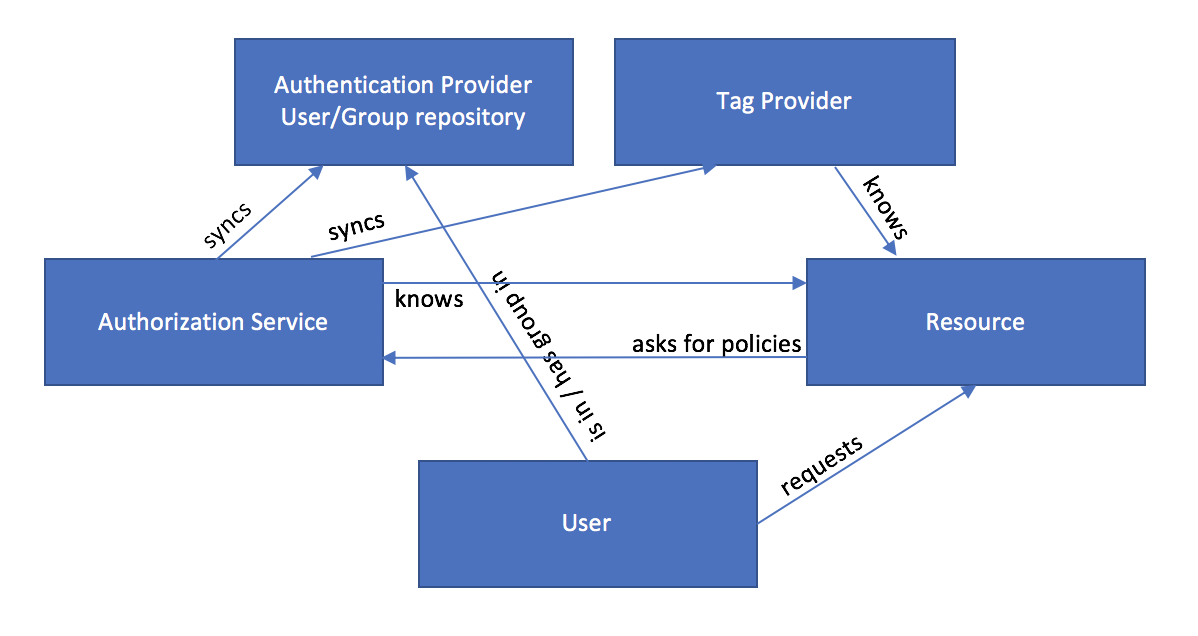
Tag Based Authorization
Tag-based authorization is not so much more different. Instead of having a set of policies that match resources with users/groups, you create a set of policies that match tags with users/groups. This means also, that you need another instance or service to match resources with tags. Now, whenever you create a new resource, the only thing you need to do is to tag it. All existing policies for that tag will automatically apply for the new resource. This gives you more flexibility if you have a complex authorization model in your company, because one tag might be connected with multiple security policies:
It saves you from duplicating the same policies from similar resources
It’s more user-friendly and comes more natural to assign tags to a resource than thinking about which permissions/policies might be required, everytime you add a new resource.
In tag-based authorization security policies match tags with users/groups.
The Process
As mentioned before, an additional service is needed to manage the relationship between resources and tags. The authorization service knows the resource, syncs user and groups as well as the tags for the resources. The tag provider knows the resource and is the interface for the user to assign tags to the resource.
Typical components and interactions involved in tag-based authorization.
You can manage tags and govern your data sources using Apache Atlas. Apache Atlas integrates well with Apache Ranger and other services in the Big Data Landscape and can be integrated with any tool by leveraging its REST API.
Create Useful Tags
Tagging is powerful, since you can look from different angles at your resources, i.e., you can introduce multiple dimensions. Once you decided to go with tag-based security, the first step is to think about which dimensions you want to introduce in the beginning. The second step is to consistently apply those dimensions across your resources.
You can think of dimensions as categories of tags:
One category of tags classifies a resource, e.g., a database based on the source system the data came from: MySQL, Server Log, HBase, …
Another category of tags introduces the dimension of use cases: cyber_security, customer_journey, marketing_campaign2, …
A third category might be the career level within a company: common, manager, executive
Another category of tags distinguishes departments: sales, engineering, marketing, …
As long as you are consequently tagging your resources appropriately, the advantages of tagging in the context of authorization are immediately apparent: When you create a new resource, for example a Hive table, you apply the tags MySQL, customer_journey, executive, marketing and based on the pre-defined tag-based policies you’ll know that
The technical user, that does the hourly load from the MySQL database to Hive has write access to the table.
The team of all people that work on the customer journey project has read access to the table.
All employees on the executive level have read access to the table.
The marketing department has full access to the table.
Conclusions
I hope this article made it easy to understand the process and benefits of tag-based authorization. However, simplified security is only one of the benefits of tagging. Tagging is also useful to describe lineage and thus facilitate data governance.
When you onboard a new data source on Apache Metron and you use Elastic Search (ES) as your indexing + search engine you need to specify and submit an ES template before the indexing topology attempts the first write to the ES cluster.
The template should contain the following items:
Dynamic fields for possible geo enrichments of any ip address field,
dynamic fields for other kinds of enrichments
well defined static fields (“properties”) based on the fields that are unique to this parser.
As found in the official Metron docs: The metron_alert field type needs to be nested. As per the documentation, if you forget to do this, you’ll run into this Exception:
QueryParsingException[[nested] failed to find nested object under path [metron_alert]];
curl -X POST $ELASTICSEARCH_MASTER/_template/squid_index -d @template.json
Step 4: Check if template was created correctly
curl -X GET $ELASTICSEARCH_MASTER/_template | python -m json.tool
You can find a basic, fully working squid template here.
Troubleshooting
If you query a collection via the Kibana Metron UI and see an error similar to the following exception in the Elastic Search Master log, your template is either not valid or the index is not using it.
Caused by: java.lang.IllegalArgumentException: Fielddata is disabled on text fields by default. Set fielddata=true on [source:type] in order to load fielddata in memory by uninverting the inverted index. Note that this can however use significant memory. Alternatively use a keyword field instead.
Thus, after you created the template and after you ingested your first events via the random access indexing topology, you want to check if your (rollover) index was created with the correct template:
# check if our squid index is there:
curl -X GET $ELASTICSEARCH_MASTER/_cat/indices
## example output:
## yellow open squid_index_2018.11.26.23 l7BO0FflRg6H0op3fM5wkw 5 1  5  0  48.3kb  48.3kb
## yellow open .kibana                   sEGp3YyZSXu40A1nRv1umQ 1 1 46 41 207.4kb 207.4kb

# check in the logs if there is a line that specifies which template was used when the index was created:
tail -f /var/log/elasticsearch/metron.log
## example output:
## ...
## [2018-11-26T23:13:58,395][INFO][o.e.c.m.MetaDataCreateIndexService][condla0.field.hortonworks.com] [squid_index_2018.11.26.23] creating index, cause [auto(bulk api)], templates [squid_index], shards [5]/[1], mappings [squid_doc]
## ...
Important Things to Note
/var/log/elasticsearch/metron.log is the most important log file for debugging ES template related actions
If you want to make your new data source available in Kibana, don’t forget to add the index pattern – in our case "squid_index_*":
Apache Metron aims to be a tool for analysts in a cyber security team to help them defining intelligent alerts, detecting threats and work on them in real-time. This is the first blog post in a row to ease operations and share my experiences with Apache Metron. Thus, it serves as an introduction to Metron.
Technical Introduction
Apache Metron is a cyber security platform making heavy use of the Hadoop Ecosystem to create a scalable and available solution. It utilizes Apache Storm and Apache Kafka to parse, enrich, profile, and eventually index data from telemetry sources, such as network traffic, firewall logs, or application logs in real-time. Apache Solr or Elastic Search are used for random access searches, while Apache Hadoop HDFS is used for long term and analytical storage. It comes with its own scripting language “Stellar” to query, transform and enrich data. A security operator/analyst uses the Metron Management UI to configure and manage input sources as well the Metron Alerts UI to search, filter and group events.
Metron Alerts UI, showing a few dummy events from a Squid log.
Scope of this Post
Since virtually every data source can be used to generate events, it is natural that the platform operator/analyst wants to add data from new sources over time. I use this post as a small check list, to document considerations for the “onboarding” process of new data sources. You might want to automate this process in a way that works for you. In future posts I will cover the steps in detail.
Onboard a New Data Source
I need to ingest data to Kafka
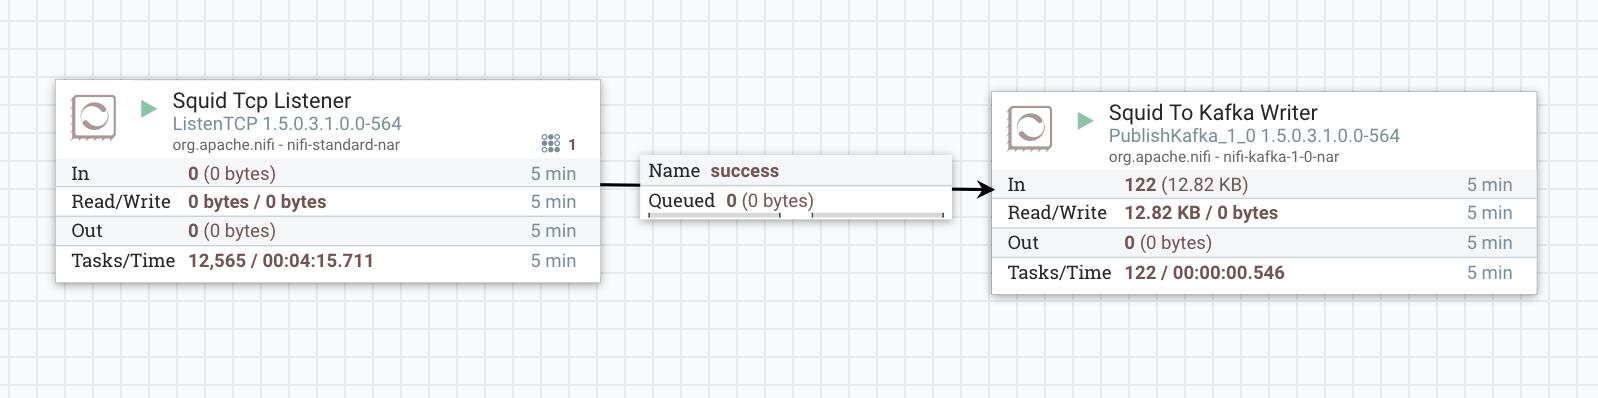
It’s very handy to use Apache NiFi for the ingest part. Just create a data flow consisting of two processors: a simple tcplistener to receive data and a Kafka producer to push the event further into Kafka.
I can also push data directly into Kafka if the architecture, firewall and the source system allow it.
If there are no active components on the source system pushing data, I might want to install an instance of MiNiFi on my source system.
Simple example of a data ingest into Kafka via NiFi
Before I can ingest data into Kafka, I need a new Kafka topic
While the Kafka topics “enrichments” and “indexing” Kafka topics will be used by all data sources, the parser topics are specific to a data source.
I create a topic named “squid” with a number of partitions that corresponds to the amounts of data I receive.
To make the events searchable, i.e., to store the events into Apache Solr, I need to create a new Solr collection (or Elastic Search template)
For each parser Storm topology and parser Kafka topic, there is a parser Solr collection.
I add a few specific fields common to all Metron Solr collections and optionally define data source specific fields in the schema.xml.
I create a new collection named “squid” with a number of shards that corresponds to the amount of data I receive.
I define my parser in the Metron Management UI
I click the “+” button in the right bottom corner of the Metron Management UI.
I configure my parser by choosing a Java class and/or define a Grok pattern, insert a sample and check if the parsed output is what I expect.
I configure the parser: Kafka topic name, Solr collection name, parser config, enrichment defintions, threat intel logic, transformations, parallelism.
I save the parser configuration and press the “Play” button next to the new parser to start it.
Metron Management UI with my configured parsers. Currently only the Squid parser is running that produces the events in the first screenshot.
Outlook
I hope this post was helpful and informative. For questions I refer to the documentation, future posts, the Metron mailing list or post a question below.
Hadoop is old, everyone has their own Hadoop cluster and everyone knows how to use it. It’s 2018, right? This article is just a collection of a few gotchas, dos and don’ts with respect to User Management that shouldn’t happen in 2018 anymore.
Terminology
Just a few terms and definitions so that everyone is on the same page for the rest of the article. Roll your eyes and skip that section if you are an advanced user.
OS user = user that is provisioned on the operating system level of the nodes of a Hadoop cluster. You can check if the user exists on OS level by doing
id username
KDC = Key Distribution Center. This might be a standalone KDC implementation, such as the MIT KDC or an integrated one behind a Microsoft Active Directory.
Keytab = file that stores the encrypted password of a user provisioned in a KDC. Can be used to authenticate without the need of typing the password using the “kinit” command line tool.
Do
Make sure your users are available on all nodes of the OS, as well as in the KDC. This is important for several reasons:
When you run a job, the job might create staging/temporary directories in the /tmp/ directory, which are owned by the user running the job. The name of the directory is the name of the OS user, while the ownership belongs to authenticated user. In a secure cluster the authenticated user is the user you obtained a Kerberos ticket for from the KDC.
Keytabs on OS level should be only readable by the user OS user who is supposed to authenticate with them for security purposes.
When impersonation is turned on for services, e.g., Oozie using the -doas tag, Hive using the property hive.server2.enable.doAs=True property or Storm using the supervisor.run.worker.as.user=true property, a user authenticated as a principal will run on the OS level as a processs owned by that user. If that user is not known to the OS, the job will fail (to start).
Don’t
Don’t use the hdfs user to run jobs on YARN (it’s forbidden by default and don’t change that configuration). Your problem can be solved in a different way! Only use the hdfs user for administrative tasks on the command line.
Don’t run Hive jobs as the “hive” user. The “hive” user is the administrative user and if at all should only be used by the Hadoop/database administrator.
Or in general: Don’t use the <service name> user to do <operation> on <service name>. You saw that coming, hm?
How to Achieve Synchronisation of KDC and OS Level
(…or other user/group management systems). This is a tricky one, if you don’t want to run into a split brain situation, where one system knows one set of users and another one knows others, which may or may not overlap.
Automate user provisioning, e.g., by using an Ansible role that provisions a user in the KDC and on all nodes of the Hadoop cluster.
Use services such as SSSD (System Security Services Daemon) that integrates users and groups from user and group management services into the operating system. So you won’t need to actually add them to each node, as long as SSSD is up and running.
Manually create OS users on all nodes and in the KDC (don’t do that, obviously ;P )
While security is a quite complex topic by itself, security of distributed systems can be overwhelming. Thus, I wrote down a state of the art article about Hadoop (Ecosystem) Security Concepts and also published it on Hortonworks Community Connection.
In the documentation of the particular security related open source projects you can find a number of details on how these components work on their own and which services they rely on. Since the projects are open source you can of course check out the source code for more information. Therefore, this article aims to summarise, rather than explain each process in detail.
In this article I am first going through some basic component descriptions to get an idea which services are in use. Then I explain the “security flow” from a user perspective (authentication –> impersonation (optional) –> authorization –> audit) and provide a short example using Knox.
When reading the article keep following figure in mind. It depicts all the process that I’ll explain.
Provides RESTful API and a UI to manage authorization policies and service access audits based on resources, users, groups and tags.
Ranger User sync:
Syncs users and groups from an LDAP source (OpenLDAP or AD)
Stores users and groups in the relational DB of the Ranger service.
Ranger Plugins:
Service side plugin, that syncs policies from Ranger per default every 30 seconds. That way authorization is possible even if Ranger Admin does not run in HA mode and is currently down.
Ranger Tag Sync:
Syncs tags from Atlas meta data server
Stores tags in the relational DB of the Ranger service.
Ranger Key Management Service (KMS):
Provides a RESTful API to manage encryption keys used for encrypting data at rest in HDFS.
Supporting relational Database:
Contains all policies, synced users, groups, tags
Supporting Apache Solr instances:
Audits are stored here.
Documentation:
For the newest HDP release (2.6.0) use these Ranger Docs
Knox serves as a gateway and proxy for Hadoop services and their UIs so that they can be accessible behind a firewall without requiring to open too many ports in the firewall.
Documentation:
For the newest HDP release (2.6.0) use these Knox Docs
Active Directory
Components:
Authentication Server (AS)
Responsible for issuing Ticket Granting Tickets (TGT)
Ticket Granting Server (TGS)
Responsible for issuing service tickets
Key Distribution Center (KDC)
Talks with clients using KRB5 protocol
AS + TGS
LDAP Server
Contains user and group information and talks with its clients using the LDAP protocol.
Supporting Database
Wire Encryption Concepts
To complete the picture I just want to mention that it is very important, to not only secure the access of services, but also encrypt data transferred between services.
Keystores and Truststores
To enable a secure connection (SSL) between a server and a client, first an encryption key needs to be created. The server uses it to encrypt any communication. The key is securely stored in a keystore for Java services JKS could be used. In order for a client to trust the server, one could export the key from the keystore and import it into a truststore, which is basically a keystore, containing keys of trusted services. In order to enable two-way SSL the same thing needs to be done on the client side. After creating a key in a keystore the client can access, put it into a trust store of the server. Commands to perform these actions are:
Generate key in "/path/to/keystore.jks" setting its alias to "myKeyAlias" and its password to "myKeyPassword". If the keystore file "/path/to/keystore.jks" does not exist, this will command will also create it.
Import key from a file “myKeyFile.cer” with alias “myKeyAlias” into a keystore (that may act as truststore) named “/path/to/truststore.jks” using the password “trustStorePassword”
Only a properly authenticated user (which can also be a service using another service) can communicate successfully with a kerberized Hadoop service. Missing the required authentication, in this case by proving the identity of both user and the service, any communication will fail. In a kerberized environment user authentication is provided via a ticket granting ticket (TGT).
Note: Not using KERBEROS, but SIMPLE authentication, which is set up by default, provides any user with the possibility to act as any other type of user, including the superuser. Therefore strong authentication using Kerberos is highly encouraged.
Technical Authentication Flow:
User requests TGT from AS. This is done automatically upon login or using the kinit command.
User receives TGT from AS.
User sends request to a kerberized service.
User gets service ticket from Ticket Granting Server. This is done automatically in the background when user sends a request to the service.
User sends service a request to the service using the service ticket.
Authentication Flow from a User Perspective:
Most of the above processes are hidden from the user. The only thing, the user needs to do before issuing a request from the service is to login on a machine and thereby receive a TGT or receive it programmatically or obtain it manually using the kinit command.
Impersonation
This is the second step after a user is successfully authenticated at a service. The user must be authenticated, but can then choose to perform the request to the service as another user. If everyone could do this by default, this would raise another security concern and the authentication process would be futile. Therefore this behaviour is forbidden by default for everyone and must be granted for individual users. It is used by proxy services like Apache Ambari, Apache Zeppelin or Apache Knox. Ambari, Zeppelin and Knox authenticate as “ambari”, “zeppelin”, “knox” users, respectively, at the service using their TGTs, but can choose to act on behalf of the person, who is logged in in the browser in Ambari, Zeppelin or Knox. This is why it is very important to secure these services.
To allow, for example, Ambari to perform operations as another user, set the following configs in the core-site.xml, hadoop.proxyuser.ambari.groups and hadoop.proxyuser.ambari.hosts, to a list of groups or hosts that are allowed to be impersonated or set a wildcard *.
Authorization
Authorization defines the permissions of individual users. After it is clear which user will be performing the request, i.e., the actually authenticated or the impersonated one, the service checks against the local Apache Ranger policies, if the request is allowed for this certain user. This is the last instance in the process. A user passing this step is eventually allowed to perform the requested action.
Audit
Every time the authorization instance is called, i.e., policies are checked if the action of a user is authorized or not, an audit event is being logged, containing, time, user, service, action, data set and success of the event. An event is not logged in Ranger in case a user without authentication tries to access data or if a user tries to impersonate another user, without having appropriate permissions to do so.
Example Security Flow Using Apache Knox
Looking at the figure above you can follow what’s going on in the background, when a user Eric wants to push a file into the HDFS service on path “/user/eric/” from outside the Hadoop cluster firewall.
User Eric sends the HDFS request including the file and the command to put that file into the desired directory, while authenticating successfully via LDAP provider at the Apache Knox gateway using his username/password combination. Eric does not need to obtain a Kerberos ticket. In fact, since he is outside the cluster, he probably does not have access to the KDC through the firewall to obtain one anyway.
Knox Ranger plugin checks, if Eric is allowed to use Knox. If he’s not, the process ends here. This event is logged in Ranger audits.
Knox has a valid TGT (and refreshes it before it becomes invalid), obtains a service ticket with it and authenticates at the HDFS namenode as user “knox”.
Knox asks the service to perform the action as Eric, which is configured to be allowed.
Ranger HDFS plugin checks, if Eric has the permission to “WRITE” to “/user/eric”. If he’s not, the process ends here. This event is logged in Ranger audits.
File is pushed to HDFS.
I hope this article helps to get a better understanding of the security concepts within the Hadoop Ecosystem.
This is a simple walk-through of an example usage of Luigi. Online there is the excellent documentation of Spotify themselves. You can find all bits and bytes out there to create your own pipeline script. Also, there are already a few blog posts about what is possible when using Luigi, but then – I believe – it’s not very well described how to implement it. So, in my opinion there is either too much information to just try it out or too few information to actually get started hands-on. Also, I’ll mention a word about security.
Therefore, I publish a full working example of a minimalist pipeline from where you can start, copy and paste everything you need
These are the question I try to answer:
What is Luigi and when do I want to use it?
How do I setup the Luigi scheduler?
How do I specify a Luigi pipeline?
How do I schedule a Luigi pipeline?
Can I use Luigi with a secure Hadoop cluster?
What I like about Luigi?
What is Luigi?
Luigi is a framework written in Python that makes it easy to define and execute complex pipelines in a consistent way. You can use Luigi …
… when your data is processed in (micro) batches, rather than it is streamed
… when you want to run jobs that depend on (many) other jobs.
… when you want to have nice visualizations of your pipelines to keep a good overview.
… when you want to integrate data into the Hadoop ecosystem.
… when you want to do any of the above and love Python.
Create Infrastructure
Every pipeline can actually be tested using the --local-scheduler tag in the command line. But for production you should use a central scheduler running on one node.
The first thing you want to do is to create a user and a group the scheduler is running as.
groupadd luigi
useradd -g luigi luigi
The second step is to create a Luigi config directory.
You also need to install Luigi (and Python and pip) if you did not do that already.
pip install luigi
It’s now time to deploy the configuration file. Put the following file into /etc/luigi/luigi.cfg. In this example the Apache Pig home directory of a Hortonworks Hadoop cluster is specified. There are many more configuration options listed in the official documentation.
You are now prepared to start up the scheduler daemon.
sudo su - luigi
luigid --background --port 8088 --address www.example.com --pidfile /var/run/luigi/luigi.pid --logdir /var/log/luigi --state-path /var/lib/luigi/luigi.state'
A Simple Pipeline
We are now ready to go. Let’s specify an example pipeline that actually can be run without a Hadoop ecosystem present: It reads data from a custom file, counting the number of words and writing the output to a file called count.txt. In this example two of the most basic task types are used: luigi.ExternalTask which requires you to implement the output method and luigi.Task which requires you to implement the requires, output and run methods. I added pydocs to all methods and class definitions, so the code below should speak for itself. You can also view it on Github.
import luigi

class FileInput(luigi.ExternalTask):
'''
Define the input file for our job:
The output method of this class defines
the input file of the class in which FileInput is
referenced in "requires"
'''

# Parameter definition: input file path
input_path = luigi.Parameter()

def output(self):
'''
As stated: the output method defines a path.
If the FileInput  class is referenced in a
"requires" method of another task class, the
file can be used with the "input" method in that
class.
'''
return luigi.LocalTarget(self.input_path)

class CountIt(luigi.Task):
'''
Counts the words from the input file and saves the
output into another file.
'''

input_path = luigi.Parameter()

def requires(self):
'''
Requires the output of the previously defined class.
Can be used as input in this class.
'''
return FileInput(self.input_path)

def output(self):
'''
count.txt is the output file of the job. In a more
close-to-reality job you would specify a parameter for
this instead of hardcoding it.
'''
return luigi.LocalTarget('count.txt')

def run(self):
'''
This method opens the input file stream, counts the
words, opens the output file stream and writes the number.
'''
word_count = 0
with self.input().open('r') as ifp:
for line in ifp:
word_count += len(line.split(' '))
with self.output().open('w') as ofp:
ofp.write(unicode(word_count))

if __name__ == "__main__":
luigi.run(main_task_cls=CountIt)
Schedule the Pipeline
To test and schedule your pipeline create a file test.txt with arbitrary content.
We can now execute the pipeline manually by typing
python pipe.py --input-path test.txt
Use the following if you didn’t set up and configure the central scheduler as described above
If you did everything right you will see that no tasks failed and a file count.txt was created that contains the count of the words of your input file.
Try running this job again. You will notice that Luigi will tell you that there already is a dependency present. Luigi detects that the count.txt is already written and will not run the job again.
Now you can easily trigger this pipeline on a daily base by using, e.g., crontab in order to schedule the job to run, e.g., every minute. If your input and output file has the current date in the filename’s suffix, the job will be triggered every minute, but successfully run only exactly once a day.
In a crontab you could do the following:
1 * * * * python pipe.py --input-path test.txt
Security
The cool thing about Luigi is, that you basically don’t need to worry much about security. Luigi basically uses the security features of the components it interacts with. If you are, e.g., working on a secure Hadoop cluster (that means on a cluster, where Kerberos authentication is enforced) the only thing you need to worry about, is that you obtain a fresh Kerberos ticket before you trigger the job – given that the validity of the ticket is longer than the job needs to finish. I.e., when you schedule your pipeline with cron make sure you do a kinit from a keytab. you can check out my answer to a related question on the Hortonworks community connection for more details on that (https://community.hortonworks.com/questions/5488/what-are-the-required-steps-we-need-to-follow-in-s.html#answer-5490) .
What do I like about Luigi?
It combines my favourite programming language and my favourite distributed ecosystem. I didn’t go too much into that now. But Luigi is especially great because of its rich ways to interact with Hadoop Ecosystem services. Instead of a LocalTarget you would rather use HdfsTargets or Amazon S3Targets. You can define and run Pig jobs and there even is a Apache Hive client built in.